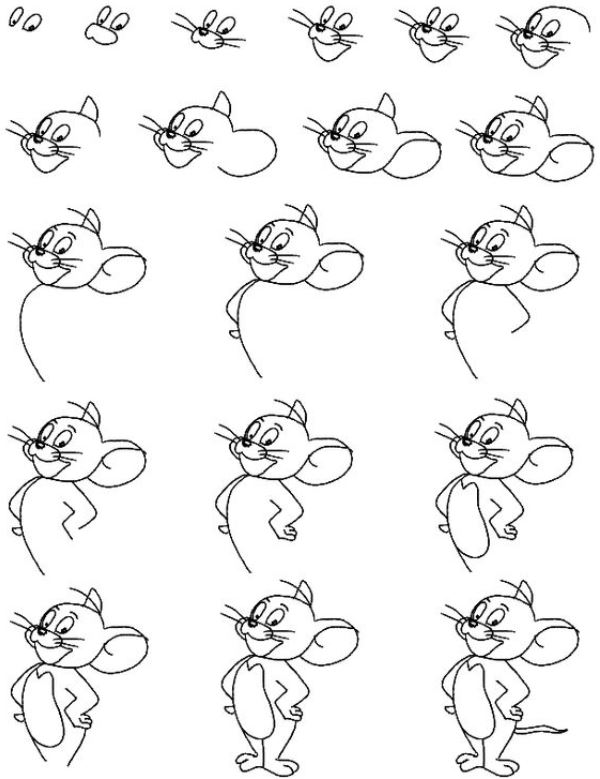
Follow our easy tutorial and you will have your own Jerry mouse drawing! This is a great instructional article to teach kids how to draw Jerry from Tom & Jerry.
First, you want to get started by drawing Jerry’s head. Draw a half circle for the top of his head and his ear is on the top of his head in the shape of a shark fin. Next, draw his eyeballs, his snout, his nose, his mouth, and his whiskers. Third, draw his other ear, which is a large oblong circle that includes the outline of his head. After that, draw his body and his 2 arms on the side of his body. Next, draw his stomach and finish his arms and hands. Lastly, draw his 2 legs and feet at the bottom of his body. You can color Jerry brown, his stomach light brown, and his ears light pink.
Step-By-Step Jerry From Tom and Jerry Drawing Tutorial
If you are a beginner who loves the famous cartoon show Tom & Jerry and wants to learn how to draw the adorable mouse Jerry, then you have come to the right place! Drawing Jerry can seem tricky, but with this step-by-step tutorial, you will be able to create your own version of the beloved character in no time. So, let’s get started!
Materials Needed
To draw Jerry, you will need sketching paper, pencils of varying grades, and an eraser. You may also use colored pencils, crayons, or markers if you want to add color to your drawing.
Before you start, sharpen all your pencils and keep them handy. Also, ensure that you have enough lighting to see your paper clearly.
Step 1 – Draw Jerry’s Head, Face, and Eyes
Start by drawing a large circle in the center of your paper. This circle will form Jerry’s head. Draw a smaller circle on the lower half of the large circle. This smaller circle will form Jerry’s nose.
Next, draw two intersecting lines across the large circle. These lines will act as guidelines to help you place Jerry’s facial features accurately. The horizontal line should be just above the smaller circle, and the vertical line should be in the center of the large circle.
Draw a small oval shape above the horizontal line, slightly to the right. This shape will form Jerry’s right eye. Draw a similar, but smaller oval shape above and to the left of the horizontal line. This will form Jerry’s left eye.
Step 2 – Draw Jerry’s Face and Add Details
Now that you have drawn the basic shapes and guidelines, it’s time to sketch Jerry’s face. Start by drawing Jerry’s ears on either side of his head. The ears should be triangular and slightly pointed at the top.
Next, draw Jerry’s eyes. Start with the right eye. Draw a small circle within the oval shape you drew earlier. Shade the top half of the circle to create Jerry’s eyelid. Draw a small circle within the circle to represent Jerry’s pupil. Shade the area around the pupil to create the iris. Repeat these steps to draw Jerry’s left eye.
Draw Jerry’s nose by adding a small triangular shape at the bottom of the smaller circle you drew earlier. Draw a curved line above the nose to create Jerry’s smile.
Step 3 – Draw Jerry’s Body Including His Neck, Arms, Hands, Legs, and Feet
Now that you have drawn Jerry’s face, it’s time to draw his body. Start by drawing Jerry’s neck. Draw a curved line from the bottom of Jerry’s head to the top of his body.
Next, draw Jerry’s arms. Draw two curved lines on either side of Jerry’s body. These lines should start from the bottom of Jerry’s head and end at the bottom of his body. Draw Jerry’s hands by drawing two small ovals at the end of each arm.
Draw Jerry’s legs by drawing two curved lines from the bottom of his body. These lines should be slightly longer than Jerry’s arms. Draw Jerry’s feet by drawing two small ovals at the end of each leg.
Step 4 – Add Details to Jerry’s Face
Now that you have drawn Jerry’s basic features, it’s time to add some details to his face. Start by drawing Jerry’s eyebrows. Draw two curved lines above each eye to create Jerry’s eyebrows. Draw a small curved line above each eyebrow to create Jerry’s forehead wrinkles.
Draw Jerry’s whiskers by drawing three lines on either side of his nose. These lines should be slightly curved and spaced apart evenly. Draw Jerry’s pupils by adding two small circles within each iris.
Step 5 – Add Details to Jerry’s Body
Now that you have drawn Jerry’s basic body, it’s time to add some details. Start by drawing Jerry’s shirt collar. Draw a curved line around Jerry’s neck, just below his head.
Draw Jerry’s shirt by adding two curved lines below his collar. These lines should be slightly wider at the top and narrower at the bottom. Draw a small bowtie at the bottom of Jerry’s shirt by drawing two triangles and a small rectangle in the center.
Step 6 – Erase Guidelines and Adding Final Details
Now that you have drawn Jerry’s basic features and body, it’s time to erase the guidelines and add some final details. Use your eraser to carefully remove the guidelines you drew earlier.
Draw Jerry’s teeth by adding two small triangles at the bottom of his smile. Draw Jerry’s tail by drawing a long, thin curved line at the bottom of his body.
Step 7 – Add Color to Jerry
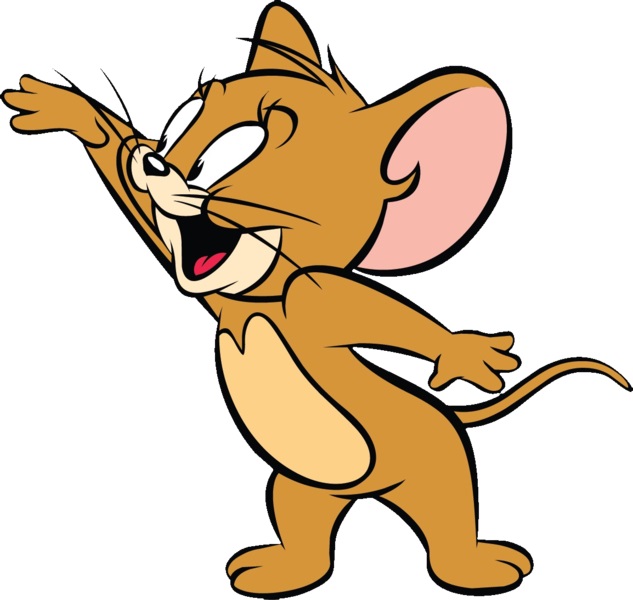
If you want to add color to your drawing, start by coloring Jerry’s nose and bowtie red. Color Jerry’s eyes blue and his pupils black. Color Jerry’s shirt yellow and his body gray.
Tips For Drawing Jerry From Tom & Jerry
To draw Jerry from Tom & Jerry, start with a light sketch of his head using a circle as the base and adding guidelines for the facial features. Draw his large, oval-shaped eyes with small pupils and pointy ears. Next, sketch his body with a small circle for the chest, a larger oval for the belly, and thin, curved lines for the arms and legs. Add the details by drawing Jerry’s white belly fur, the lines on his ears, and his whiskers using thin lines. Color him in shades of gray with a white belly, pink ears, and nose. Use shading to give his body more depth. Remember to maintain the cartoonish appearance by keeping the proportions and shapes balanced.

In Summary
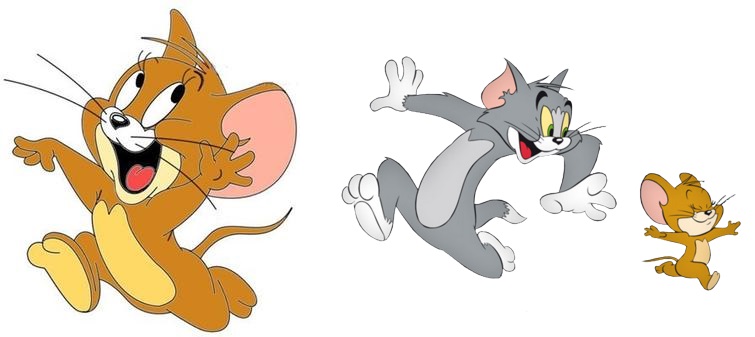
Congratulations, you have successfully learned how to draw Jerry from Tom & Jerry! With practice, you can improve your drawing skills and create your version of Jerry in different poses and scenarios.
Overall, drawing Jerry from Tom and Jerry can be a fun and rewarding experience. By following these steps and practicing regularly, you can improve your skills and create your own unique version of Jerry.