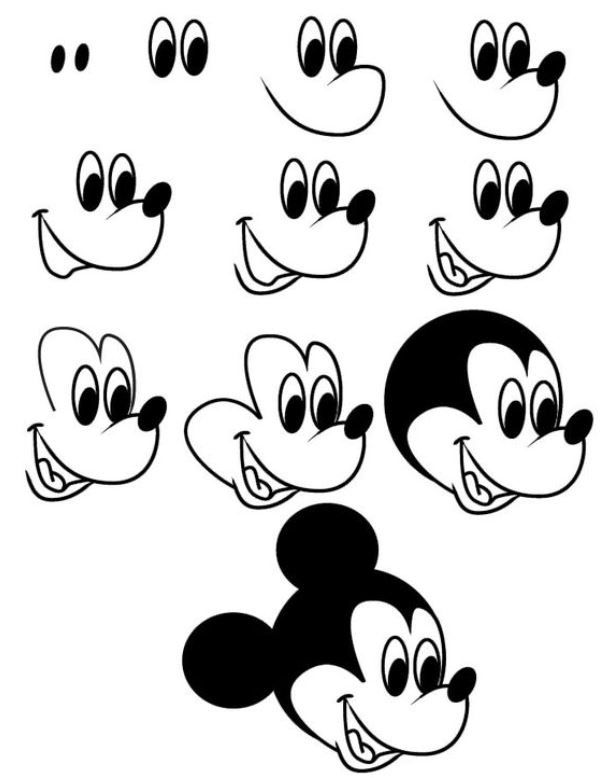
First, draw the pupils and the eyes. Second, draw the nose shape and color in a black oval as a mouse nose at the end. Third, draw Mickey’s smiling open mouth with a tongue in the mouth. Fourth, draw the outline around the eyes and the cheek. Fifth, draw a round circle that will be Mickey’s head. Sixth, draw two ears for Mickey and make sure you color in the ears, head, pupils, and nose.
If you’re a fan of Mickey Mouse, then he’s probably one of your favorite cartoon characters. And if you want to learn how to draw him, you’re in luck! This guide will teach you how to draw Mickey Mouse’s head step-by-step.
Step 1: Draw Mickey Mouse’s Pupils and Eyes
- You can start by drawing Mickey Mouse’s eyes and pupils. You can easily do this by drawing a large oval and coloring in a circle at the bottom of the eyes.
Step 2: Draw The Nose Shape And Color In A Black Oval As A Mouse Nose At The End
- Remember, Mickey Mouse’s nose is small, round and flat. It’s not drawn with a straight line or a curved line—it has its own shape!
- Draw the black oval as shown in the picture above.
- Now that you have drawn the black oval for Mickey Mouse’s mouse nose at the end of his face shape, color it in with black ink or marker pen so that there are no white spaces left over from where you have drawn this shape on your paper.

Step 3: Draw Mickey’s Smiling Open Mouth With A Tongue In The Mouth
Begin by drawing a circle shape for Mickey Mouse’s mouth. Draw an angled line on top of the circle, and then draw a small line at the bottom of it to make his tongue stick out. Color in Mickey Mouse’s open smiling mouth with a tongue sticking out using black colored pencils or crayons.
Step 4: Draw the outline around the eyes and cheek.
Draw a curved line that will be around Mickey’s eyes and cheek.
Draw a line from the bottom of his eyes to the top of his mouth.
Draw another curved line that will run from just above his nose down to meet this first one.
Step 5: Draw A Round Circle That Will Be Mickey Mouse’s Head.
Now it’s time to draw a circle. This circle will be the size of Mickey Mouse’s head, which is not too big or too small. You don’t want to make it too big or you will make Mickey Mouse look like he has a giant head! If you make it too small, then he won’t look like Mickey Mouse at all.
Step 6: Finish Your Drawing By Drawing Two Ears For Mickey, Coloring Them In, And Adding Details Like Pupils, Noses, Mouths, Or Any Other Features You Like
To finish off your drawing, you’ll need to draw two ears for Mickey. Start with a circle and then make an S-shape with its center at the top of the head. Then, make a V-shaped line pointing down into each ear.
After you’ve drawn in his ears, color them in using black or brown markers. You can also add other features like pupils or mouths if you’d like.

Conclusion
Remember, when drawing Mickey Mouse, you can always make your drawing more personal by adding your own unique touches. For example, I like to add pupils and noses on my drawings so they look more like the characters from my favorite cartoon shows. You could also try drawing one ear on each side of the head instead of just one pair at the top like we did here today.
