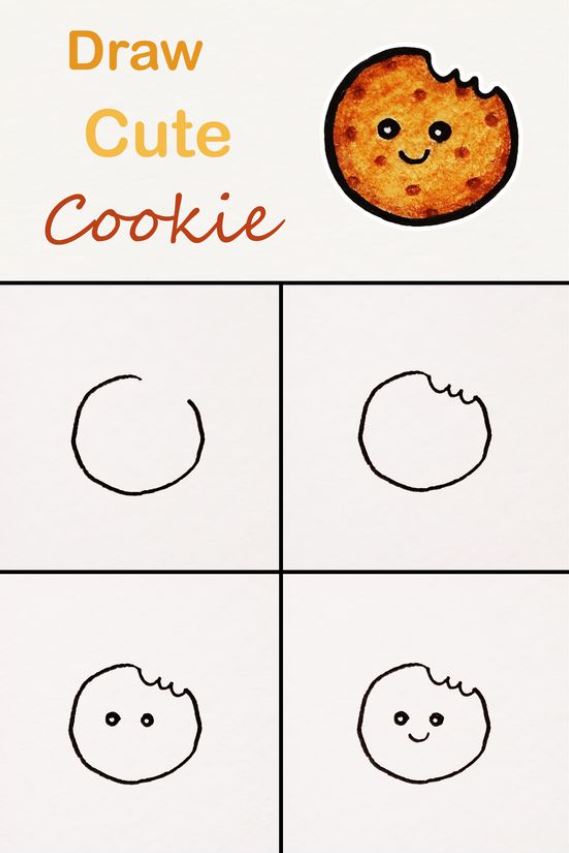
First, start by drawing a circle with an opening in the top right corner. Then, draw several wave-like shapes to represent teeth biting into a cookie. After that, draw a cute face on your cookie. Color it in with your favorite colors or use brown and you have your kawaii cookie drawing.
Step-By-Step Kawaii Cookie Drawing Tutorial
Are you someone who loves to draw cute things? Then you must have heard of kawaii art, which is all about drawing cute, adorable, and charming characters. One of the most popular items in kawaii art is the cookie. In this blog post, we will guide you on how to draw a kawaii cookie step-by-step. You don’t need to be an expert artist to follow these steps; all you need is a pencil, eraser, and paper, and you’re good to go. So, let’s get started!
Materials
Before we start, let’s gather the materials you’ll need to draw a kawaii cookie:
1. Pencil
2. Eraser
3. Paper
Make sure you have a good quality pencil that can create both light and dark lines. Also, use an eraser that can remove marks cleanly without smudging the paper.
Step 1: Sketching the Outline of the Kawaii Cookie
Start by sketching the outline of the cookie. Draw a circle and add a smaller circle inside it. This will be the cookie’s chocolate chips. Next, add a curved line on top of the cookie to create the cookie’s “cracking” effect. Draw a small rectangle under the cookie to create the cookie’s “feet.”
Don’t worry if your lines are not perfect at this stage. We will refine the details later.
Step 2: Drawing the Chocolate Chips on Your Kawaii Cookie
Now, let’s draw the chocolate chips inside the cookie. Draw small, oval-shaped circles inside the smaller circle we drew earlier. The chocolate chips should be different sizes and placed randomly inside the cookie.
Step 3 – Adding the Face
It’s time to add the cute expression on the cookie’s face. Draw two small circles for the eyes and add a curved line underneath for the mouth. Make sure the eyes are not too close to the top of the cookie and the mouth is in the center.
Step 4 – Creating the Blush on the Face
To make the cookie look even cuter, let’s add some blush to its cheeks. Draw two small circles on both cheeks and shade them lightly with your pencil.
Step 5 – Refining the Details of your Kawaii Cookie
Now that we have the basic outline and details, let’s refine them to make the cookie look more polished. Start by erasing any stray lines and making the lines darker where necessary. Pay attention to the curves and make them smoother.
Step 6 – Coloring the Kawaii Cookie
Now, it’s time to add some color to the cookie. You can use any color you like, but we recommend using light brown for the cookie and dark brown for the chocolate chips. Color the cookie first, then add the chocolate chips.
Step 7 – Adding the Final Touches to Your Kawaii Cookie Drawing
Finally, let’s add some final touches to the cookie. You can add some shading to make the cookie look more realistic. Also, add highlights to the chocolate chips and eyes to make them look shiny. Don’t forget to sign your artwork!
Tips for Drawing a Kawaii Cookie Easy
To draw a cute kawaii cookie, start by sketching a simple circle using a pencil or drawing software. Next, add a cute face by drawing two large circles for the eyes, a smaller circle for the nose, and a small smile below it. Draw two small circles on top of the cookie for the cheeks and shade them slightly to create a 3D effect. Add some details to the cookie by drawing chocolate chips or sprinkles on top. To make it even cuter, give the cookie arms and legs by drawing two small arms and legs coming out of the bottom. Use pastel colors for the cookie and brighter colors for the sprinkles or chocolate chips. Finally, add shading with a darker shade of the same color or light gray for depth and dimension.
In Summary
There you have it; you have successfully drawn a kawaii cookie step-by-step. With practice, you can draw even more adorable kawaii characters. Remember, the key to drawing kawaii art is to keep it cute and simple. Happy drawing!