Follow our easy tutorial and you will have your own kawaii cloud drawing! This is a great instructional article to teach kids how to draw a kawaii cloud.
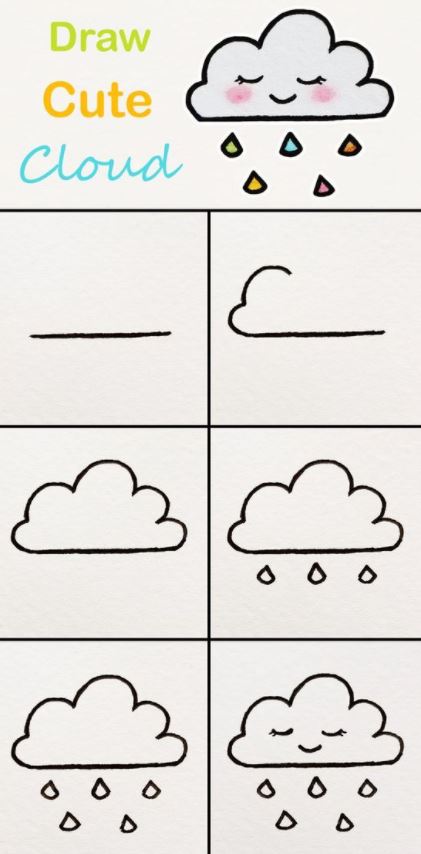
First, your cloud should be a half-circle shape with a flat bottom and almost circular bubble shapes at the top. You can also draw a half circle and then draw several circles at the top to make the shape of the cloud. Next, draw several drops coming out of the bottom of the cloud to show that it is raining. In the middle of your cloud, draw a cute kawaii face. You can keep the eyes shut and the mouth smiling. Last but not least, you can color in the raindrops and even add some color to the face of your cloud.

Step-By-Step Kawaii Cloud Drawing Tutorial
If you’re a beginner who wants to learn how to draw kawaii rainy clouds, you’ve come to the right place. Kawaii is a Japanese word that means “cute,” and it’s a popular art style that uses simple shapes and pastel colors. Drawing a kawaii rainy cloud might look challenging, but it’s actually easy if you follow these steps. So, let’s get started!
Materials Needed
First, gather your materials: a pencil, eraser, paper, and colored pencils or markers. You can use any size paper, but a standard 8.5 x 11 inch sheet works well.
Step 1 – Sketch the Kawaii Cloud Shape
Start by drawing a cloud shape in the center of your paper. Make it large and fluffy, with rounded edges. Use light, loose strokes so you can erase any mistakes later. Don’t worry about making it perfect yet, we’ll refine it in the next step.
Next, draw two curved lines at the bottom of the cloud to create a flat bottom. This will make it look like the cloud is sitting on the ground. Then, draw a smaller, fluffier cloud shape on top of the first cloud. This will be the top of the rainy cloud. Make sure the edges overlap a bit.
Finally, draw a curved line on the left side of the cloud to indicate where the rain will fall. This line should be thinner than the cloud edges and curve slightly to the right. Take a step back and look at your sketch. Does it look like a kawaii rainy cloud? If not, don’t worry. Keep going!
Step 2 – Refine the Kawaii Cloud Shape
Now, it’s time to refine the cloud shape. Use your pencil to darken the cloud edges and erase any unnecessary lines. Make sure the edges are smooth and rounded, not jagged or pointy. Then, darken the bottom of the cloud and add some fluffy texture with short, curved lines.
Next, refine the smaller cloud on top. Make it fluffier and add some texture with short, curved lines. Then, darken the curved line on the left side of the cloud to indicate where the rain will fall. This line should be thin and slightly curved to the right. You can also add some raindrop shapes along the line to show the rain.
Step back and look at your drawing again. Does it look like a kawaii rainy cloud now? If so, great! If not, keep refining it until you’re happy with the shape.
Step 3 – Add the Kawaii Face
Kawaii characters usually have cute faces, so let’s add a face to the cloud. Draw two large, round eyes near the top of the cloud. Then, draw a small, curved mouth below the eyes. Make the mouth slightly open, like the cloud is smiling. You can also add some rosy cheeks with two small circles on either side of the mouth.
Next, draw two small eyebrows above the eyes to give the cloud some expression. Make sure they curve slightly downward to make it look like the cloud is happy. Finally, draw a small teardrop shape below one of the eyes to make it look like the cloud is crying happy tears. Cute, right?
Step 4 – Color the Kawaii Cloud
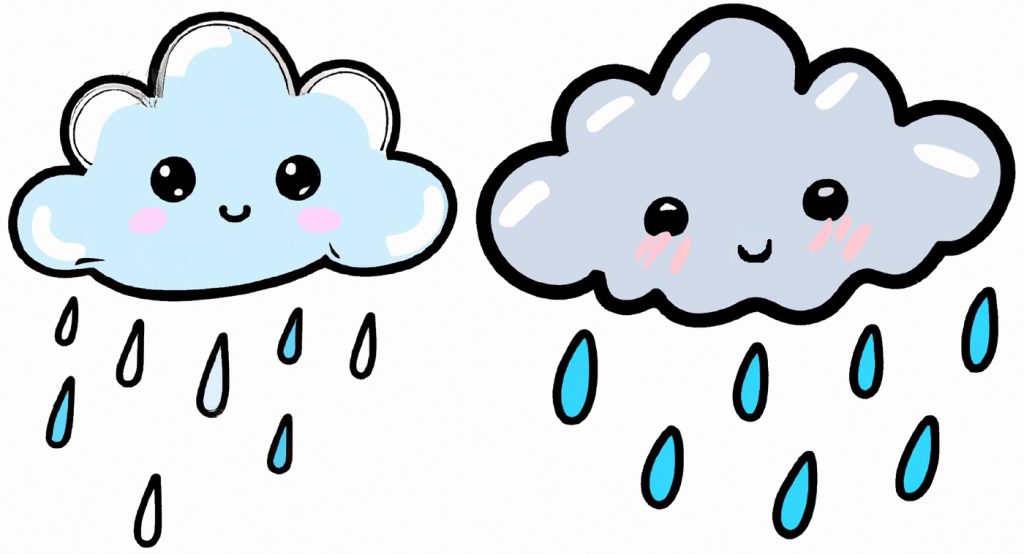
Now that the drawing is complete, it’s time to add some color. Kawaii art usually uses pastel colors, so choose colors like light blue, pink, or purple for your cloud. Use colored pencils or markers to fill in the cloud shape, leaving the raindrops white. You can also add some shading or highlights to make the cloud look more three-dimensional.
Next, color the eyes and mouth. Use black for the pupils and outline of the eyes, and a light color for the whites. Use pink or red for the mouth and cheeks. Finally, color the raindrops blue or purple to make them stand out.
Step 5 – Add Details to your Kawaii Cloud
Now that the cloud is colored, it’s time to add some final details. Use a white gel pen or marker to add highlights to the eyes and raindrops. This will make them look shiny and reflective. You can also add some sparkles around the cloud with the same pen or marker. Just draw small dots or circles around the cloud to make it look like it’s raining.
Finally, add some texture to the cloud with a black pen or marker. Draw small, curved lines or dots on the edges of the cloud to make it look fluffy. You can also add some lines or dots to the raindrops to make them look more detailed. Take a step back and admire your work. You did it!
Tips for Drawing a Kawaii Rainy Cloud
Here are some tips and tricks to help you draw kawaii rainy clouds:- Start with simple shapes and build up the details gradually.- Use light, loose strokes so you can erase mistakes easily.- Practice drawing different expressions and poses to make your clouds unique.- Experiment with different colors and shading techniques to make your clouds look more three-dimensional.- Use a white gel pen or marker to add highlights and details to your drawing.- Don’t be afraid to try different techniques and styles until you find one that works for you.
Practice Will Improve Your Kawaii Cloud Drawings
Drawing kawaii rainy clouds might take some practice, so don’t be discouraged if your first attempt doesn’t turn out how you want it to. Keep practicing and trying different techniques until you find one that works for you. You can also experiment with different colors, faces, and poses to make your clouds unique.
If you’re struggling with a specific part of the drawing, try watching a tutorial on YouTube or asking for help on an art forum. There are plenty of resources available for beginners who want to learn how to draw kawaii art.
In Summary
Congratulations, you’ve learned how to draw a kawaii rainy cloud step-by-step! Drawing kawaii art is a fun and rewarding hobby, and it’s easy to get started with. Remember to practice regularly and experiment with different techniques and styles to find your own unique style.
Drawing kawaii rainy clouds can be a fun way to express your creativity and imagination. Whether you’re a beginner or an experienced artist, there’s always something new to learn and explore in the world of kawaii art.