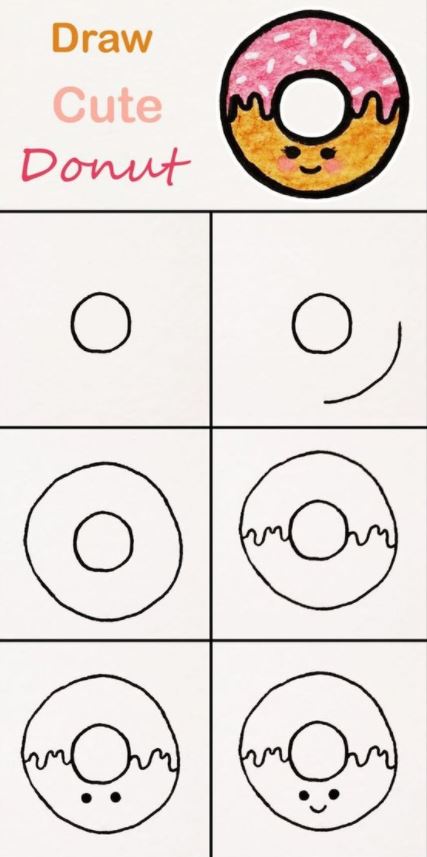
First, draw a small circle, which will be the center of your donut. Next, draw a larger circle around the smaller circle to complete the donut. Then, draw squiggly lines on the left side and right side of the donut. Fourth, draw a cute kawaii face at the bottom portion of the donut. Lastly, color in your donut, and you can use bright beautiful colors for icing and light brown for the donut.

Step-By-Step Kawaii Donut Drawing Tutorial
- Start by drawing a simple circle for the base of the donut. This will be the main body of the donut.
- Next, draw another smaller circle inside the first circle. This will be the hole in the middle of the donut.
- Add details to the donut by drawing the icing on top. You can do this by sketching curved lines or shapes to make the icing look swirled. Make the icing look bubbly and fluffy.
- Draw the donut’s sprinkles. You can make them different sizes, a different shapes, or different colors to give them more personality
- To make the donut look cuter, you can add details like a face or eyes, maybe some cute little ears, or even a tail to make it look like a cute animal.
- Finally, shade and color the donut to give it a more realistic and kawaii look.
#1 Tip For Drawing a Kawaii Donut
One way to draw a kawaii donut is to make the donut shape round and soft instead of sharp and clear. This will give the donut a kawaii-style look of being soft and cute. To do this, draw the outer edge of the donut with curved lines and make the hole in the middle round as well. Try decorating it with sprinkles, glaze, or other cute things to make it look more appealing. A cute face with small eyes and a small mouth will round your kawaii donut into shape.
