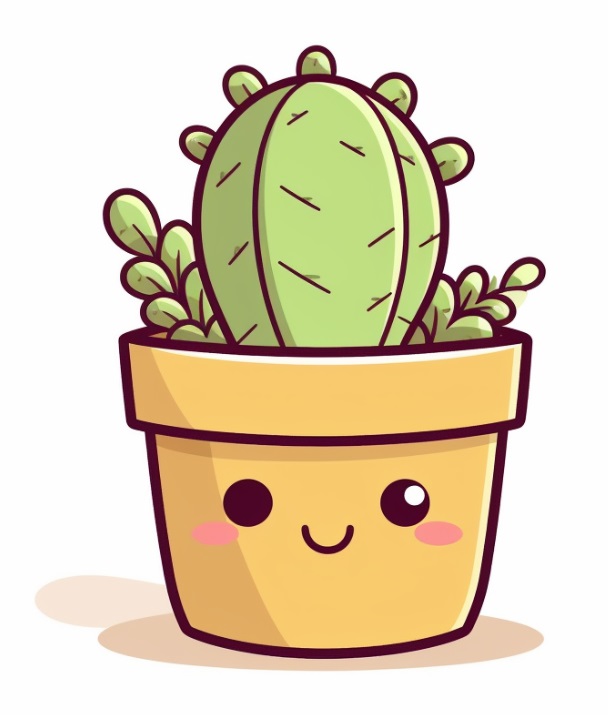
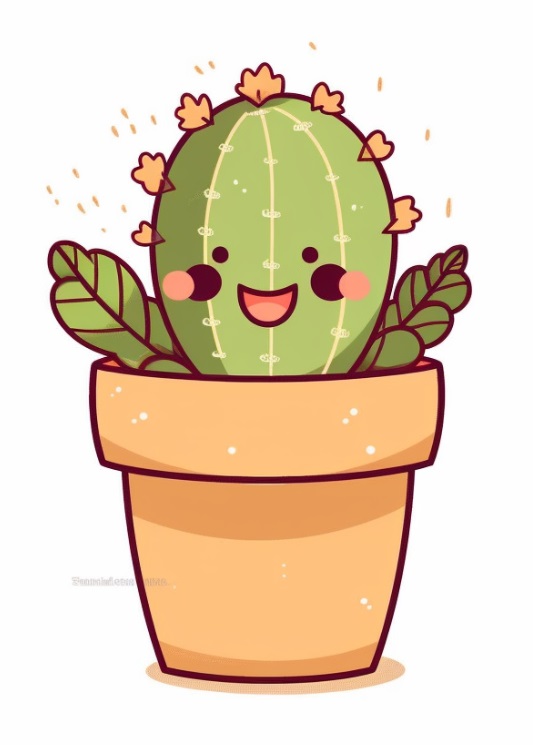
Follow our easy tutorial and you will have your own cute kawaii cactus drawing! This is a great instructional article to teach kids how to draw a kawaii cactus.
Today, we’re exploring “kawaii” art. It’s a style that’s known for being really cute and a bit over the top. If you’ve ever thought about making your drawings cuter, or if you just want a fun new thing to draw, this is for you. We’re going to show you, step by step, how to draw a really cute “kawaii” cactus. It doesn’t matter if you’re really good at drawing or just starting out, we think everyone will like this guide. So get your drawing paper ready and let’s start drawing!
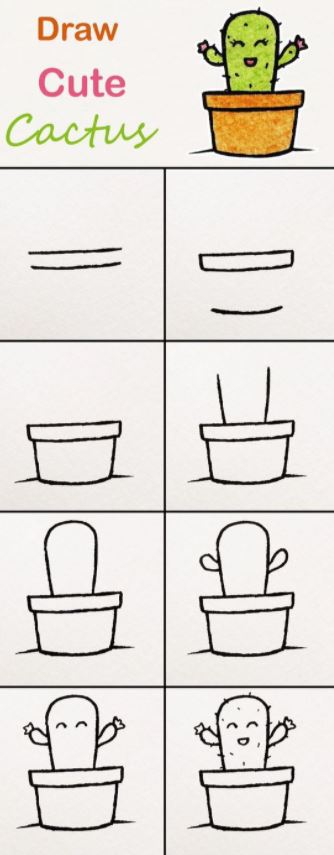
Step 1: Draw the Body of the Cactus
Start by drawing a vertical oval for the body of the cactus. This is the main part of your cactus.
Step 2: Draw the Arms of the Cactus
On either side of the vertical oval, draw a smaller oval shape for the arms of the cactus. The top of these ovals should align roughly with the middle of the main body oval.
Step 3: Add the Eyes
- Draw two large circles for the eyes near the top of the cactus body.
- Inside each eye, draw another smaller circle for the iris and then an even smaller circle inside that for the pupils.
- Draw a small curved line at the bottom of each eye to represent a “shine” effect.
Step 4: Draw the Mouth
- Below the eyes, draw a curved line for the mouth.
- If you want to give the cactus a happy expression, curve the line upwards at the ends. For a neutral or sad expression, the line can be straight or curve downward.
Step 5: Draw the Spines
Scatter small ‘V’ or ‘X’ shapes across the body and arms of the cactus to represent its spines.
Step 6: Draw the Flower
- If you’d like to add a flower, draw a small circle at the top of the cactus.
- Around this circle, draw several small teardrop shapes to create the petals of the flower.
Step 7: Draw the Pot
- Below the cactus, draw a horizontal oval for the pot. The cactus should be in the center of this oval.
- Draw two short vertical lines down from each end of the oval, then connect them with a straight horizontal line to complete the pot.
Step 8: Add Details to the Pot
If you’d like, you can add a design to the pot. This could be simple lines, polka dots, or anything else you can think of.
Step 9: Color your Cactus
Finally, color in your cactus! The cactus itself is typically green, but the pot and flower can be any colors you like.
3 Tips For Drawing a Kawaii Cactus
1. Start with Basic Shapes to Create Your Cactus
Kawaii style art is all about simple, rounded shapes. Teach kids to start their drawings with basic shapes like circles and ovals. This is a great way to make the drawing process easier and more approachable. For example, the cactus body and arms can start as ovals, and the eyes are just simple circles.
2. Emphasize Big, Expressive Eyes and a Cute Smile
One of the key features of “kawaii” style art is the large, expressive eyes. Encourage kids to draw the eyes of the cactus big and round to make it look extra cute. They can add smaller circles inside for the iris and pupils, and even a little curved line at the bottom for a “shine” effect.
3. Add Personal Touches to Your Cute Kawaii Cactus
One of the best parts of drawing is making something unique. Encourage kids to add their own personal touches to their cactus. This could be a unique pattern of spines on the cactus, a fun design on the pot, or a different kind of flower on top. This can help kids feel more connected to their art and inspire them to be more creative in the future.
FAQs for Drawing a Kawaii Cactus
What materials do I need to draw and color a kawaii cactus?
To draw and color a kawaii cactus, you’ll need a pencil for sketching, an eraser for correcting mistakes, a fine-tipped black pen or marker for outlining, and colored pencils, crayons, or markers for coloring. It’s also helpful to have a piece of paper or a sketchpad.
What is a kawaii cactus?
A kawaii cactus is a drawing of a cactus in the “kawaii” style. Kawaii is a Japanese word that translates to “cute” or “adorable,” and in art, it refers to a style that emphasizes these qualities, often with big eyes, simple shapes, and cheerful expressions. A kawaii cactus is, therefore, a cute and simplified depiction of a cactus.
Who should draw a kawaii cactus?
Anyone who enjoys drawing and wants to practice or learn the “kawaii” style can draw a kawaii cactus. It’s a simple and fun project that’s suitable for both beginners and experienced artists. Plus, because it’s so cute and cheerful, it can be particularly appealing to kids.
Is a kawaii cactus drawing a good lesson for kids?
Absolutely, a kawaii cactus drawing is a great lesson for kids. It introduces them to the concept of using basic shapes to create a picture, which is a fundamental drawing skill. Plus, the cute and cheerful style of kawaii art is often very appealing to kids, which can make the drawing process more enjoyable for them.
What is kawaii-style art?
Kawaii style art is a type of art that originated in Japan and is characterized by its cuteness, simplicity, and emphasis on adorable features. It often features characters with big eyes, small mouths, and simplistic body shapes. This style of art is used in a wide variety of media, including cartoons, clothing, toys, and more.
Conclusion
And there you have it – your very own cute “kawaii” style cactus! We hope you’ve enjoyed this step-by-step tutorial and found it both fun and easy to follow. Remember, the beauty of art is that it’s a personal expression, so don’t worry if your cactus doesn’t look exactly like our example. The most important thing is that you’ve created something unique to you and had fun in the process. Keep practicing and, over time, you’ll see your skills improve. Thanks for joining us on this artistic adventure and stay tuned for more exciting drawing tutorials to come. Until then, keep creating and keep smiling!
