Follow our easy tutorial and you will have your own cartoon motorcycle drawing! This is a great instructional article to teach kids how to draw a cartoon motorcycle.
Ever wondered how to draw a cartoon motorcycle that looks both fun and realistic? This guide will help you do just that. Drawing can seem intimidating, especially if you’re a beginner. But, with a step-by-step approach, it’s easier than you think.

Gather Materials
Before we dive into drawing, gather the necessary materials to ensure a smooth and enjoyable process. You will need:
- Pencils (preferably varying in hardness)
- Paper or a sketchbook
- Eraser
- Ruler (optional)
Having these materials ready will make it easier for you to follow along and correct any mistakes along the way.
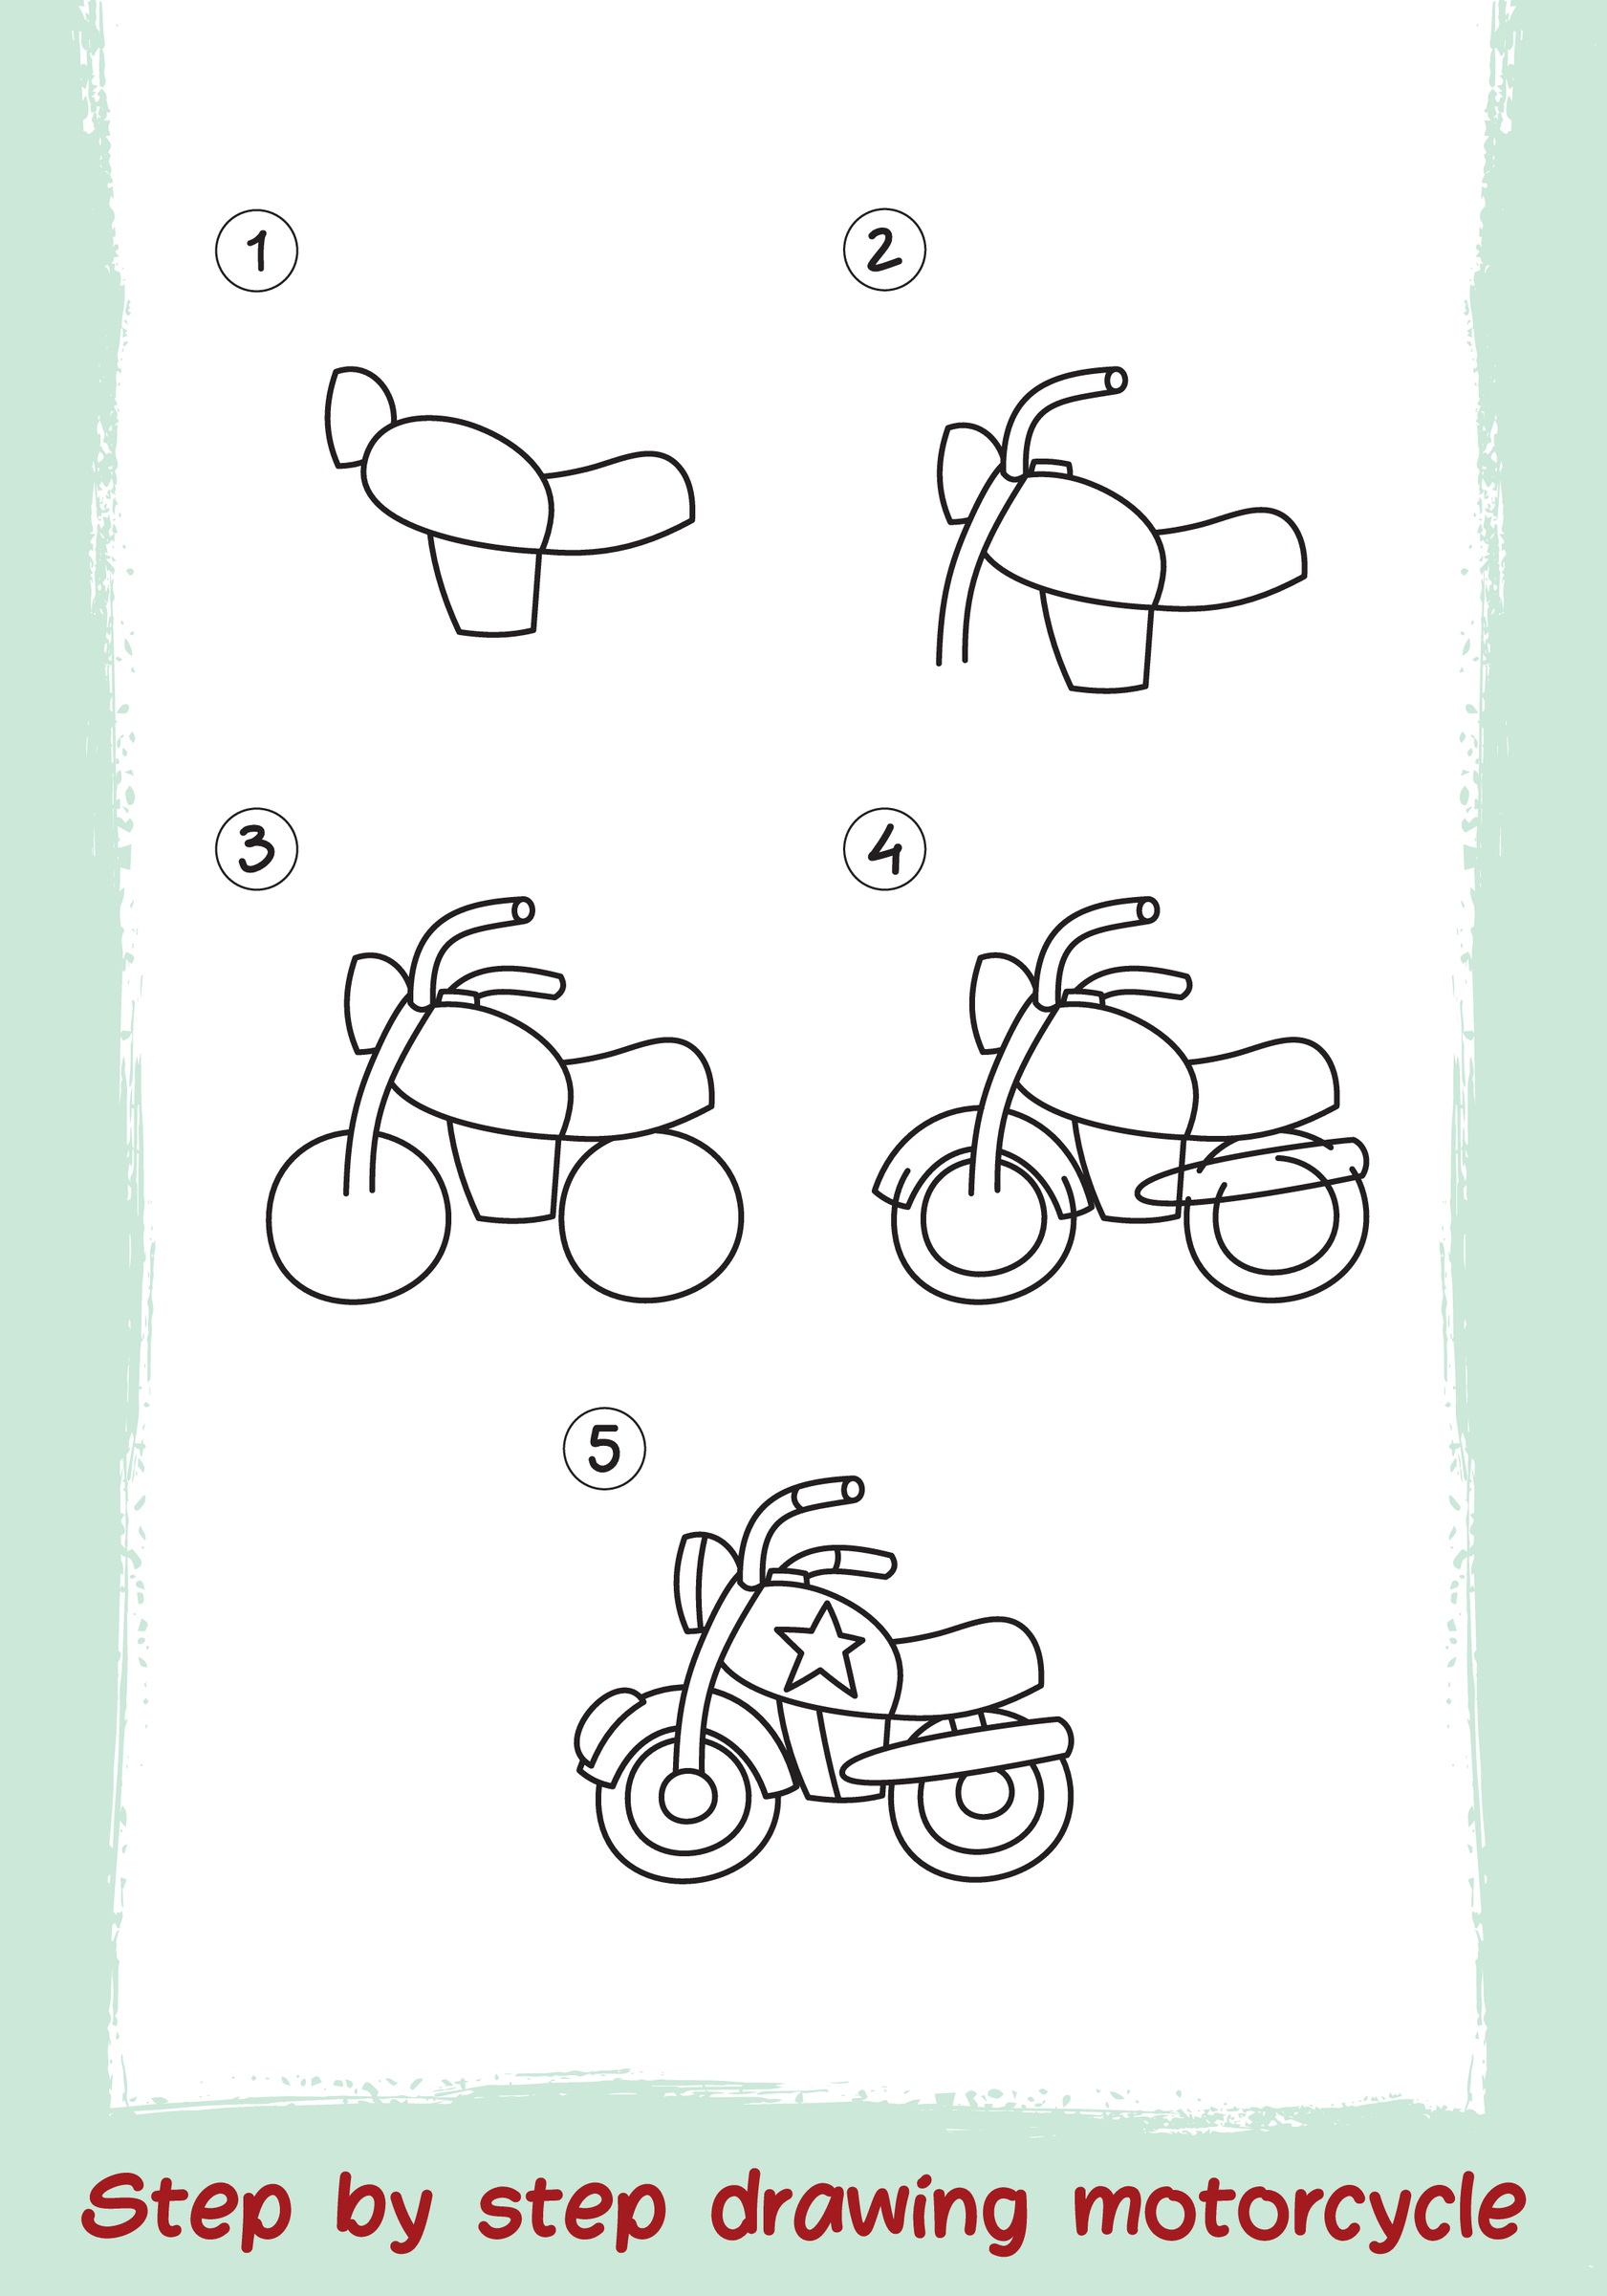
Step 1 – Start with the Basic Shapes of a Motorcycle
Begin by sketching the basic shapes that form the foundation of the motorcycle. Start with a large oval shape for the body and add smaller circles for the wheels. Don’t worry about perfection at this stage; these shapes will act as guidelines for your final drawing.
Step 2 – Outline the Body of the Motorcycle
Using the basic shapes as a reference, start outlining the body of the motorcycle. Pay attention to the proportions and contours, ensuring they align with the reference image or your imagination. Take your time and use light strokes to create the initial framework of the motorcycle.
Step 3 – Add Wheels and Tires to Your Motorcycle
Next, focus on drawing the wheels and tires. Motorcycles usually have two wheels, so make sure they are evenly sized and aligned. Add thickness to the tires by drawing additional circles within the initial circles. Use curved lines to connect the tires to the body of the motorcycle.
Step 4 – Detailing the Motorcycle
Once you have the basic structure in place, it’s time to add details that bring the motorcycle to life. Start by drawing the headlights, which are typically located at the front. Then, sketch the handlebars, seat, and fuel tank. Pay attention to the intricate details and shapes of these elements, as they greatly contribute to the overall appearance of the motorcycle.
Step 5 – Refine the Sketch of Your Motorcycle
Now that you have the main components of the motorcycle drawn, it’s time to refine the sketch. Look closely at your drawing and identify any areas that may need adjustments or corrections. Use this opportunity to refine the proportions, lines, and curves of the motorcycle. You can erase any unnecessary guidelines and make the necessary adjustments to achieve a more accurate representation of the motorcycle.
Step 6 – Erase Unwanted Lines
Once you’re satisfied with the refined sketch, you can proceed to ink the final lines of your drawing. Using a pen or a fine-tipped marker, carefully go over the outlines, making them bold and prominent. Take your time and work steadily to ensure clean, confident lines. Alternatively, if you prefer a pencil drawing, you can erase any unwanted lines from your refined sketch to achieve a clean and finished look.
Step 7 – Add Colors to Your Motorcycle
Now comes the fun part – adding colors to your motorcycle drawing! Decide on a color scheme that suits your vision and the style you want to achieve. Whether you prefer vibrant and eye-catching colors or a more muted and realistic palette, the choice is yours. Use colored pencils, markers, or even digital tools to fill in the different areas of your drawing. Consider adding gradients, shading, and highlights to create depth and dimension.
Step 8 – Add Final Touches and Details to Your Drawing
To truly bring your motorcycle drawing to life, add some final touches and details. Enhance the appearance of the motorcycle by adding shadows, reflections, and highlights where needed. Pay attention to small details such as the texture of the tires, the shine of the metal parts, and any logos or decals on the body. These finishing touches will add an extra level of realism and make your drawing stand out.
Parts of a Motorcycle
When drawing a motorcycle, there are several different parts that you should include to create a complete and realistic representation. Here are the key parts of a motorcycle that you’ll want to consider including in your drawing:
Body:
Draw the main body of the motorcycle, which is typically shaped like an elongated oval. This represents the overall shape and structure of the motorcycle.
Wheels:
Motorcycles usually have two wheels. Draw circles or ovals to represent the wheels, ensuring that they are proportional in size and aligned properly.
Tires:
Within the wheel shapes, add thickness to represent the tires. Draw additional circles within the wheel circles to depict the tires’ width and depth.
Handlebars:
Draw the handlebars that are used for steering the motorcycle. These are typically curved and extend outward from the body.
Headlight:
Motorcycles have a headlight located at the front. It is usually circular or oval in shape and positioned above the front wheel.
Fuel Tank:
Represent the fuel tank, which is where the gasoline or fuel is stored on the motorcycle. It is often positioned between the handlebars and the seat.
Seat:
Draw the seat, which is where the rider sits while operating the motorcycle. It is usually positioned behind the fuel tank.
Exhaust Pipes:
Motorcycles have exhaust pipes that release the gases produced by the engine. Draw these pipes extending from the engine area towards the rear of the motorcycle.
Engine:
Depict the engine, which is the heart of the motorcycle. It can be a complex structure, so simplify it by representing it with basic shapes and lines.
Suspension:
Motorcycles have suspension systems to absorb shocks and provide a smoother ride. Indicate the front and rear suspension by drawing lines or curves connecting the wheels to the body.
FAQ about Drawing a Motorcycle
1. How long does it take to learn how to draw a motorcycle?
The time it takes to learn how to draw a motorcycle varies from person to person. With regular practice and dedication, you can start seeing significant improvement within a few weeks or months.
2. Do I need to have prior drawing experience to draw a motorcycle?
No, you don’t need prior drawing experience to draw a motorcycle. This step-by-step guide is designed to help beginners learn the process from scratch. Just take your time, follow the instructions, and enjoy the learning journey.
3. Can I use a reference image while drawing a motorcycle?
Yes, using a reference image can be incredibly helpful, especially for beginners. It provides a visual guide for proportions, shapes, and details. Look for reference images online or use photographs of motorcycles as a reference.
4. Are there specific techniques for shading and adding depth to the motorcycle drawing?
Yes, shading and adding depth can greatly enhance the realism of your motorcycle drawing. Techniques such as hatching, cross-hatching, and blending can be used to create shadows and highlights. Experiment with different techniques to find the style that suits you best.
5. Can I add my own creative touches to the motorcycle drawing?
Absolutely! While this article provides a step-by-step guide, don’t be afraid to add your own creative touches and make the drawing unique. Feel free to customize the design, colors, and details to reflect your personal style and vision.

Conclusion
Congratulations! You’ve successfully learned how to draw a motorcycle step-by-step. Remember that drawing is a skill that improves with practice, so don’t be discouraged if your first attempts don’t turn out exactly as you hoped. Keep practicing, experimenting with different styles and techniques, and you’ll see your drawings improve over time. So grab your pencils, unleash your creativity, and enjoy the process of bringing motorcycles to life on paper!
