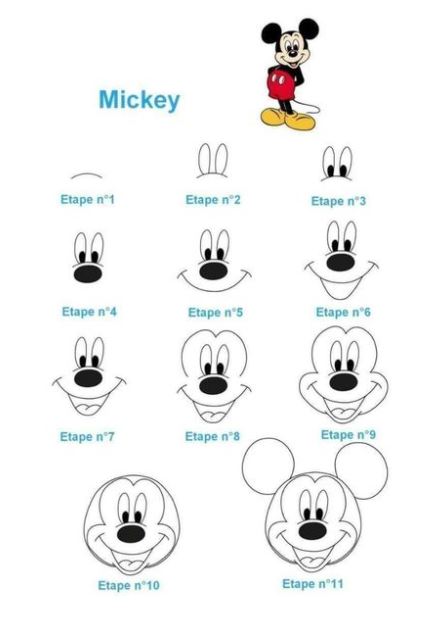
First, draw the eyes ad the base of the eyes underneath. Second, fill in the pupils, color in the nose, and draw a mouth with a smile. Third, draw a tongue in Mickey’s mouth. Fourth, draw the outline around the eyes, cheeks, and mouth. Fifth, draw a circle around the outline of Mickey’s face. Sixth, draw Mickey’s ears and color them in along with the tongue and the mouth.

How to Draw Mickey Mouse’s Face:
- Start by drawing a large circle to form the head.
- Inside the circle, draw two smaller circles for the ears.
- Draw two ovals inside the ears to give them some depth and detail.
- Draw a smaller circle inside the head for the face, leaving space for the ears.
- Draw two large, round eyes on either side of the face.
- Add a smaller circle inside each eye for the pupils, and a tiny circle inside each pupil for the reflections.
- Draw a curved line for the nose, and add a small triangle shape underneath for the nostrils.
- Draw a curved line for the mouth, and add a small circle at the end for the nose.
- Use curved lines to add the details of Mickey Mouse’s face, such as his eyebrows, whiskers, and cheeks.
- Add any additional details you like, such as his trademark red shorts and white gloves.
In Summary:
Remember to keep your lines light and loose, as you can always go back and darken them later. And don’t worry if your drawing doesn’t look perfect at first – with practice and patience, you’ll be able to draw Mickey Mouse’s face like a pro!
