When it comes to drawing animals, cats are among the favorite choices for artists of all skill levels. Their fluid movements, striking features, and expressive eyes make them an intriguing subject. In this guide, we will focus on how to draw a sitting cat, breaking down the process into easy-to-follow steps. Even if you’re a beginner, these simple instructions will help you create a beautiful and realistic sketch of a sitting cat.
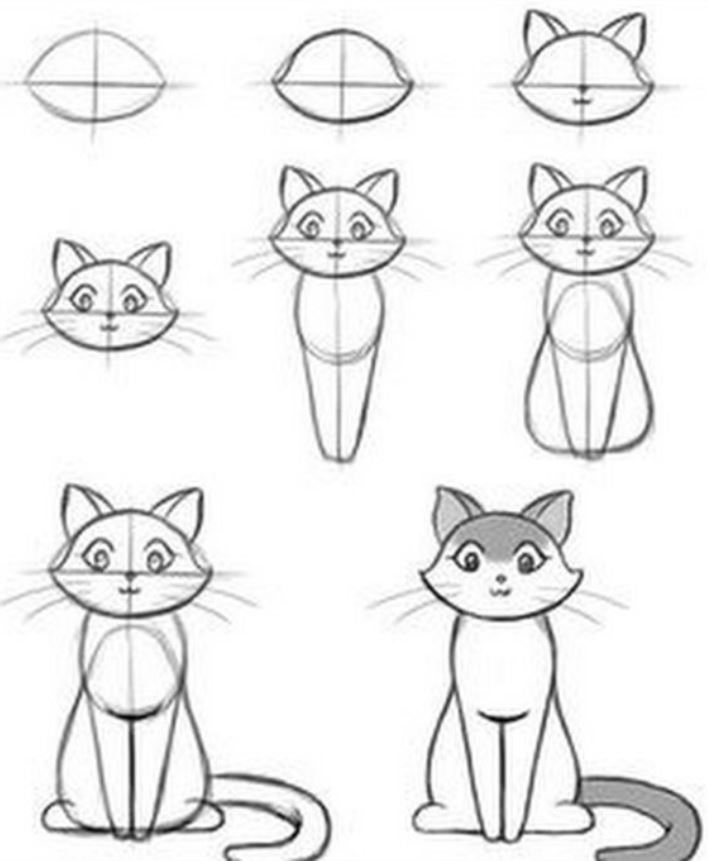
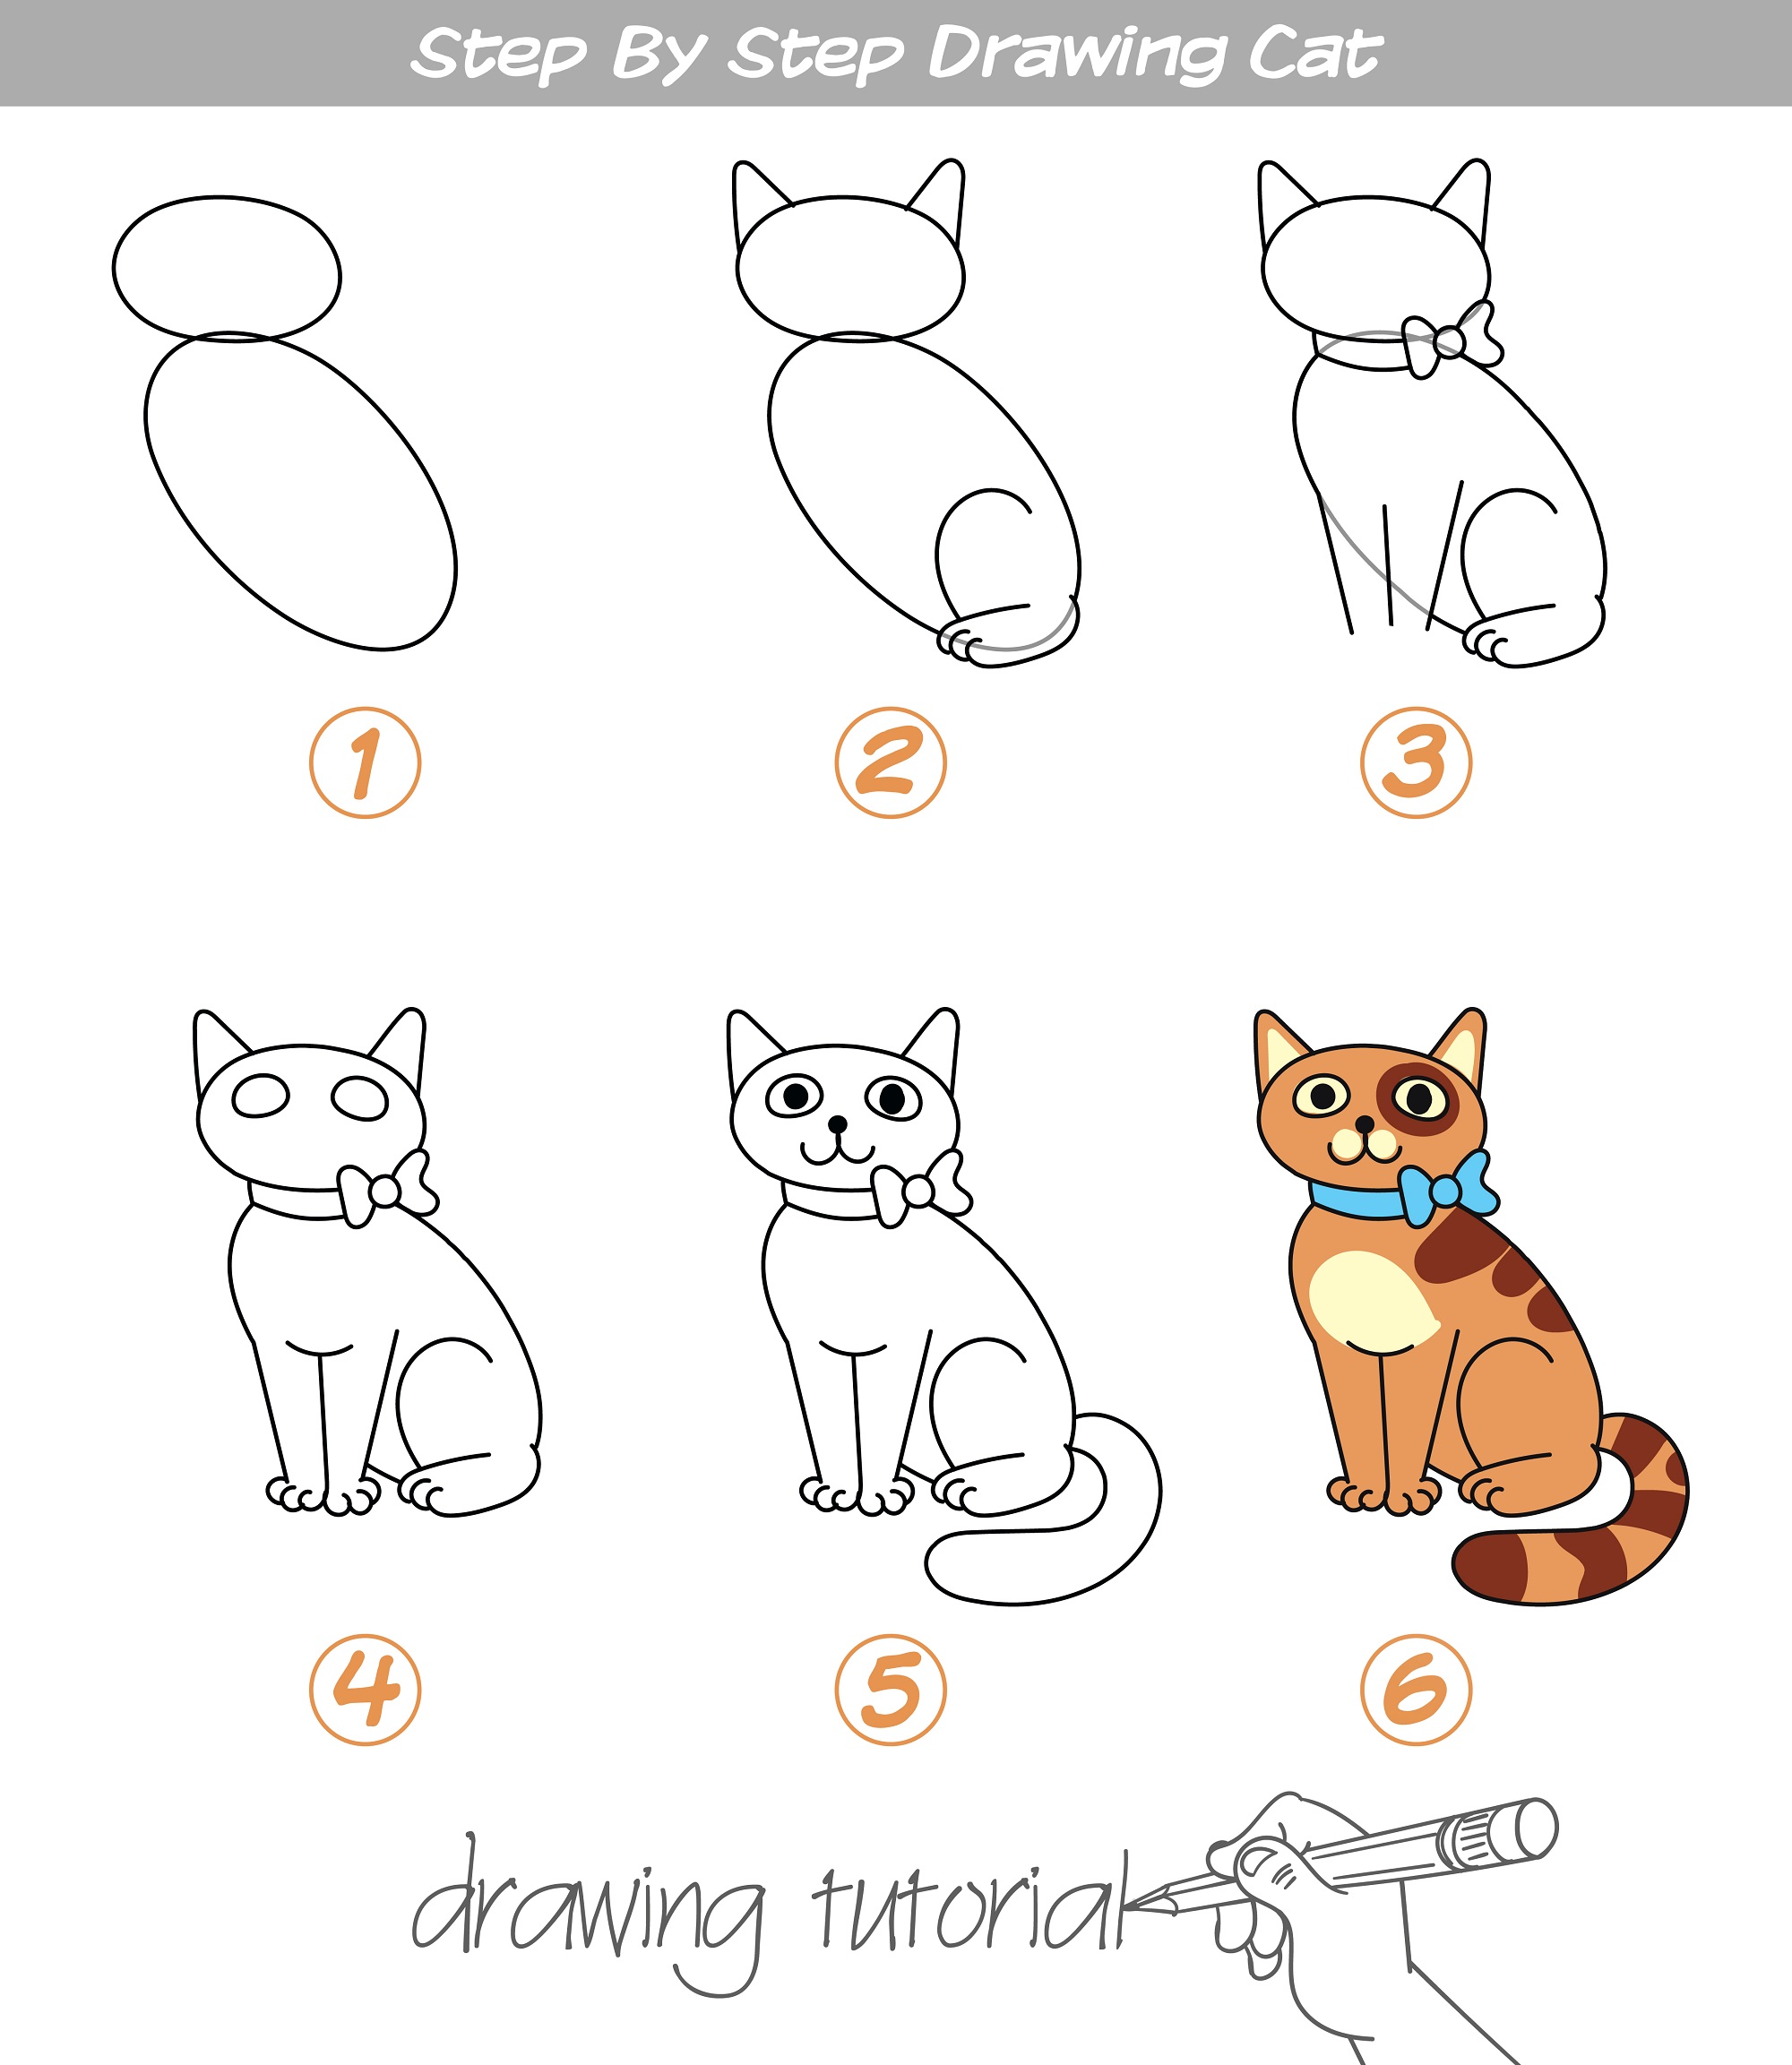
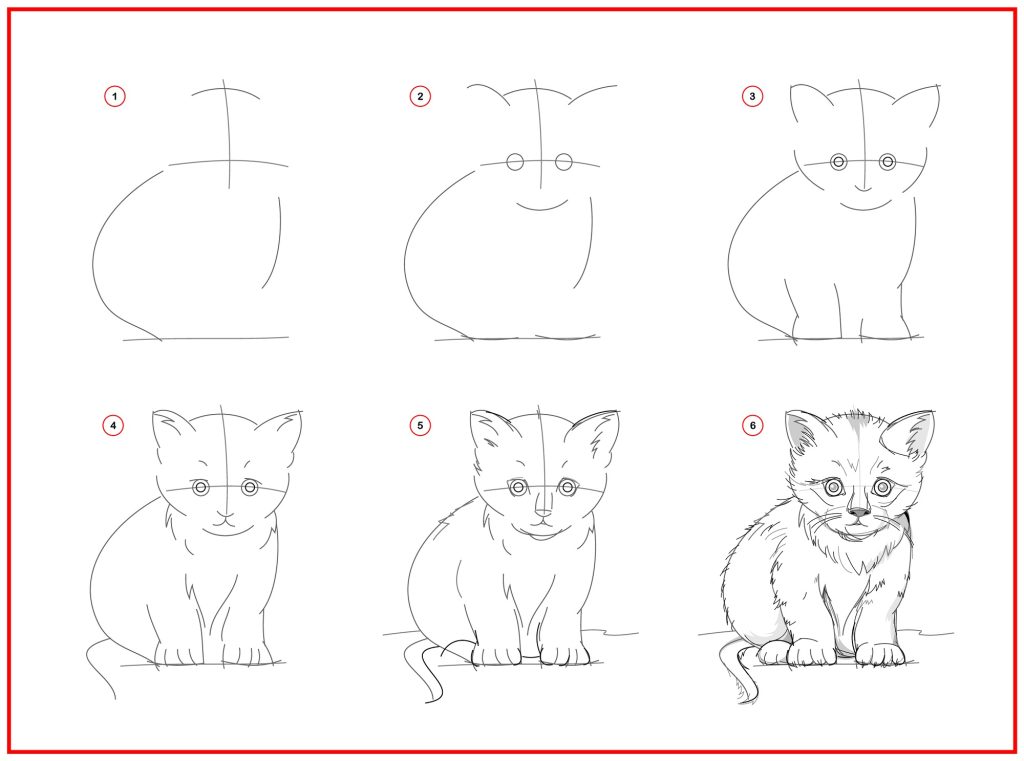
Step 1 – Draw the Head of the Cat
To start, sketch a circle to form the head of the cat. Keep it proportionate to the size you want the cat to be. Add two small triangles on top of the circle for the ears. Make sure they are positioned appropriately.
Step 2 – Draw the Body of the Cat
Extend a long oval shape from the bottom of the head to form the body. Connect the head and body smoothly to create a natural sitting posture.
Step 3 – Draw the Legs and Paws of the Cat
Now, let’s work on the legs and paws. Add four lines extending from the body to represent the legs. At the end of each line, draw small oval shapes to depict the paws. Ensure the positioning aligns with a sitting posture.
Step 4 – Draw the Eyes, Nose, and Mouth of the Cat
Give life to your cat by drawing its facial features. Add two almond-shaped eyes in the head region, a triangular nose below the eyes, and a small mouth slightly curved upwards to form a cute smile.

Step 5 – Draw the Ears of the Cat
Refine the ears by adding curves and angles. Make them pointed and slightly tilted to give the cat a more expressive look. Remember to erase the lines from step 1 that intersect with the ears.
Step 6 – Draw the Tail of the Cat
Extend a curved line from the back of the body to create the tail. Add some small curved lines throughout the tail to represent fur texture. Make it long or short according to your preference.
Step 7 – Draw and Add Details to Make Your Cat Realistic
Enhance the cat’s appearance by adding details. Draw curved lines within the ears to indicate texture. Add whiskers on each side of the cat’s face. You can also refine the shape of the body by adding gentle curves.
Step 8 – Color Your Cat
Now that your cat is complete, it’s time to bring it to life with colors! Use your imagination and choose shades that resonate with your vision. Experiment with different hues to create depth and dimension.
Understanding the Different Parts of a Cat
Understanding the anatomy of a cat can significantly improve your drawings. Take some time to study the shape of a cat’s body, the way its muscles move, and how its fur grows. You need to draw the unique nose and mouth of a cat along with the whiskers. In addition, the ears are always standing up and most cats have small heads.
4 Tips For Drawing a Sitting Cat
- Observation: Study photographs of live cats to understand their body structure and typical poses.
- Sketch Lightly: Start with light lines for the initial steps, so you can easily erase and adjust them.
- Add Details Gradually: Start with basic shapes, then gradually add more details.
- Practice: The more you draw, the better you’ll get!
How to Teach Kids to Draw a Sitting Cat
Start by simplifying the steps above when you are teaching children how to draw a seated cat. Focus on basic shapes and make the process fun and engaging. Over time, they can start adding more details to their cat drawings.

FAQs for Drawing a Sitting Cat
What color is a cat?
Cats come in a vast range of colors. They can be solid black, white, or various shades of brown, or they might have a combination of colors, including patterns like tabby, calico, and tortoiseshell. The color of a cat depends on its breed and genetic makeup.
What does a sitting cat look like?
A sitting cat usually has its body upright with the hind legs folded under, the tail may be wrapped around its body or stretched out, and the front paws are usually positioned together. Its ears are perked up, and it’s looking straight ahead or curiously around. Remember, cats are flexible creatures, so the sitting position can vary.
Who should draw a sitting cat?
Anyone who is interested in drawing or loves cats can draw a sitting cat. It’s a fun and straightforward drawing exercise that’s perfect for beginners and kids, as well as more experienced artists who want to practice their skills or explore different styles and techniques.
How can I teach kids to draw a sitting cat easily?
Teaching kids to draw a sitting cat can be made easy by breaking down the drawing into simple shapes and steps. Start with basic shapes like circles for the body and head, triangles for the ears, and so on. Then guide them to add details gradually. It’s also helpful to show them examples and encourage them to practice.
How do you draw a sitting cat for beginners?
Drawing a sitting cat for beginners can start with sketching a large circle for the body and a smaller one for the head. Add triangles on top of the head for the ears, and ovals for the eyes, and a small triangle for the nose. Draw the front paws as two lines coming down from the body, with small ovals for the feet. Draw the hind leg as a C shape on one side of the body. Add details like the whiskers, pupils, and tail. Always remember to keep it simple and step-by-step, and erase any guiding lines after the main structure is done.
How to Draw a Sitting Cat Videos
Video #1
Video #2
In Conclusion
Drawing a sitting cat may seem challenging at first, but with these step-by-step instructions, anyone can create a beautiful, realistic sketch. Remember, the key is to practice, observe, and have fun with it.
