Our how to draw a bird guide is here to help you draw your own bird. With this bird drawing tutorial, you’ll soon be able to bring these feathered friends to life on your canvas, no matter your skill level. This guide is written in easy language, perfect for beginners or young artists. We will walk you through each step of the drawing process.
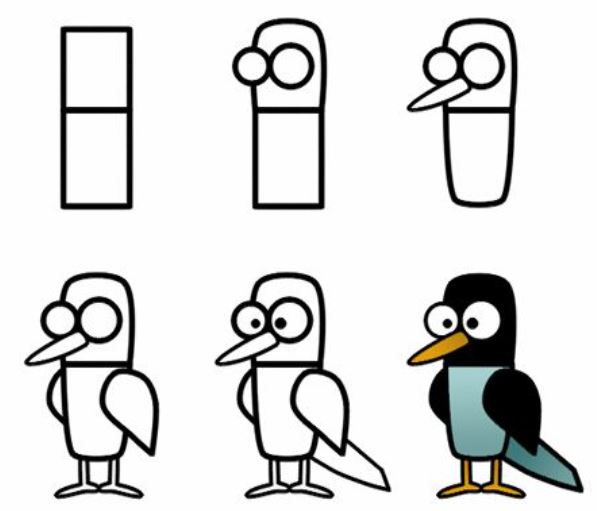
Step 1: Start with the Body
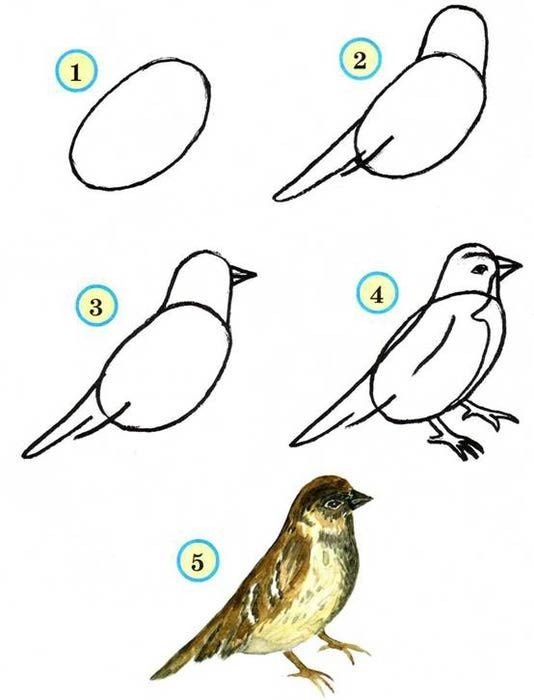
First things first, start with the body of the bird. Draw a small circle. This will be the bird’s body. Make sure you leave some space on the paper for the head and tail!
Step 2: Draw the Head
Next, let’s draw the bird’s head. Draw a slightly smaller circle above the body circle. The circles should overlap a bit – this is where the neck of the bird is.
Step 3: Sketch the Beak
Birds have beaks, right? So, we’re going to draw a triangle at the place where the head circle ends, pointing to the right. This will be our bird’s beak.
Step 4: Add the Tail
Let’s give our bird a tail. Draw two diagonal lines coming out of the body circle at the back and then connect them at the bottom. The lines should be longer if you want a long tail and shorter if you prefer a short tail.
Step 5: Draw the Wings
It’s time to give our bird its wings. Draw a big curve on the body circle, kind of like a “C” on its side. Then, draw some lines inside the wing to represent the bird’s feathers.
Step 6: Create the Legs and Feet
Our bird needs to stand, doesn’t it? Draw two lines coming out of the bottom of the body circle for the legs. At the end of each leg, draw three small lines for the bird’s toes.
Step 7: Don’t Forget the Eye
Now, let’s draw the bird’s eye. Make a small circle in the head part. Inside that circle, draw a smaller circle and color it in – that’s the bird’s pupil.
Step 8: Finalize and Erase Guidelines
Trace your bird with a darker line or a pen, making sure to leave out the lines from where the head and body circles overlap. After that, erase your sketch lines so that only your final drawing remains.
Step 9: Time to Color
Now that we’re done sketching our bird, it’s time to bring it to life with some color. Grab your colored pencils, crayons, or markers and color your bird any way you want!
FAQs for Drawing Birds
What is a Bird?
A bird is a type of vertebrate animal characterized by feathers, beak without teeth, laying hard-shelled eggs, and a strong yet lightweight skeleton. They are a diverse group with over 10,000 different species ranging from tiny hummingbirds to large ostriches.
What Color are Birds?
Birds come in a vast array of colors, from the simple black and white of a penguin to the dazzling rainbow hues of a parrot. Some birds may have a single color, while others might display a mix of various colors and patterns.
What does a Bird look like?
Birds vary greatly in size and shape, but they typically have a round body with a pair of wings, two legs, and a head with a beak. Most birds have a streamlined body to facilitate flight, and their wings are usually broad and powerful, although not all birds can fly.
Who should draw a Bird?
Anyone who enjoys drawing and wants to learn more about the shape and structure of birds should try drawing them. It’s a great way for artists of all ages, including kids, to explore the natural world and improve their observation and drawing skills.
How can I teach kids to draw Birds easily?
The best way to teach kids to draw birds is to break the process down into simple steps. Start with basic shapes to outline the bird’s body, head, wings, and beak. Gradually add in more details such as the eyes, feathers, and feet. Encourage them to observe real birds or pictures to understand their structure and colors.
What are the different parts of a Bird I need to draw?
When drawing a bird, there are several key parts you’ll need to include. These are the head (including the eyes and the beak), the body (with its distinct shape), the wings (which might be spread or folded), the tail feathers, and the legs with claws. Also, remember to add in details like the feathers which can vary in size, shape, and pattern.
Conclusion
And there you have it, a complete guide on how to draw a bird. By following these steps and practicing regularly, you’ll improve your drawing skills and gain a deeper appreciation for birds and how they look. Remember, the beauty of drawing is that there’s always room for your unique creativity and style. So, whether you’re sketching a tiny sparrow or a beautiful peacock, let this bird drawing tutorial serve as a starting point.