Are you interested in learning how to draw an owl? Owls are fascinating creatures with their unique features and captivating eyes. Drawing an owl may seem challenging, but with the right guidance and some practice, you can create a beautiful and realistic owl drawing. In this article, we will take you through the step-by-step process of drawing an owl, from sketching the basic shape to adding intricate details. Let’s get started!
Tools and Materials
Before we begin, let’s gather the tools and materials you’ll need to draw an owl:
- Drawing paper or sketchbook
- Pencils (preferably HB and 2B)
- Eraser
- Fine-tip black pen or marker
- Colored pencils or markers (optional)
- Reference image of an owl (for inspiration)
Having these tools ready will help you create a successful owl drawing.
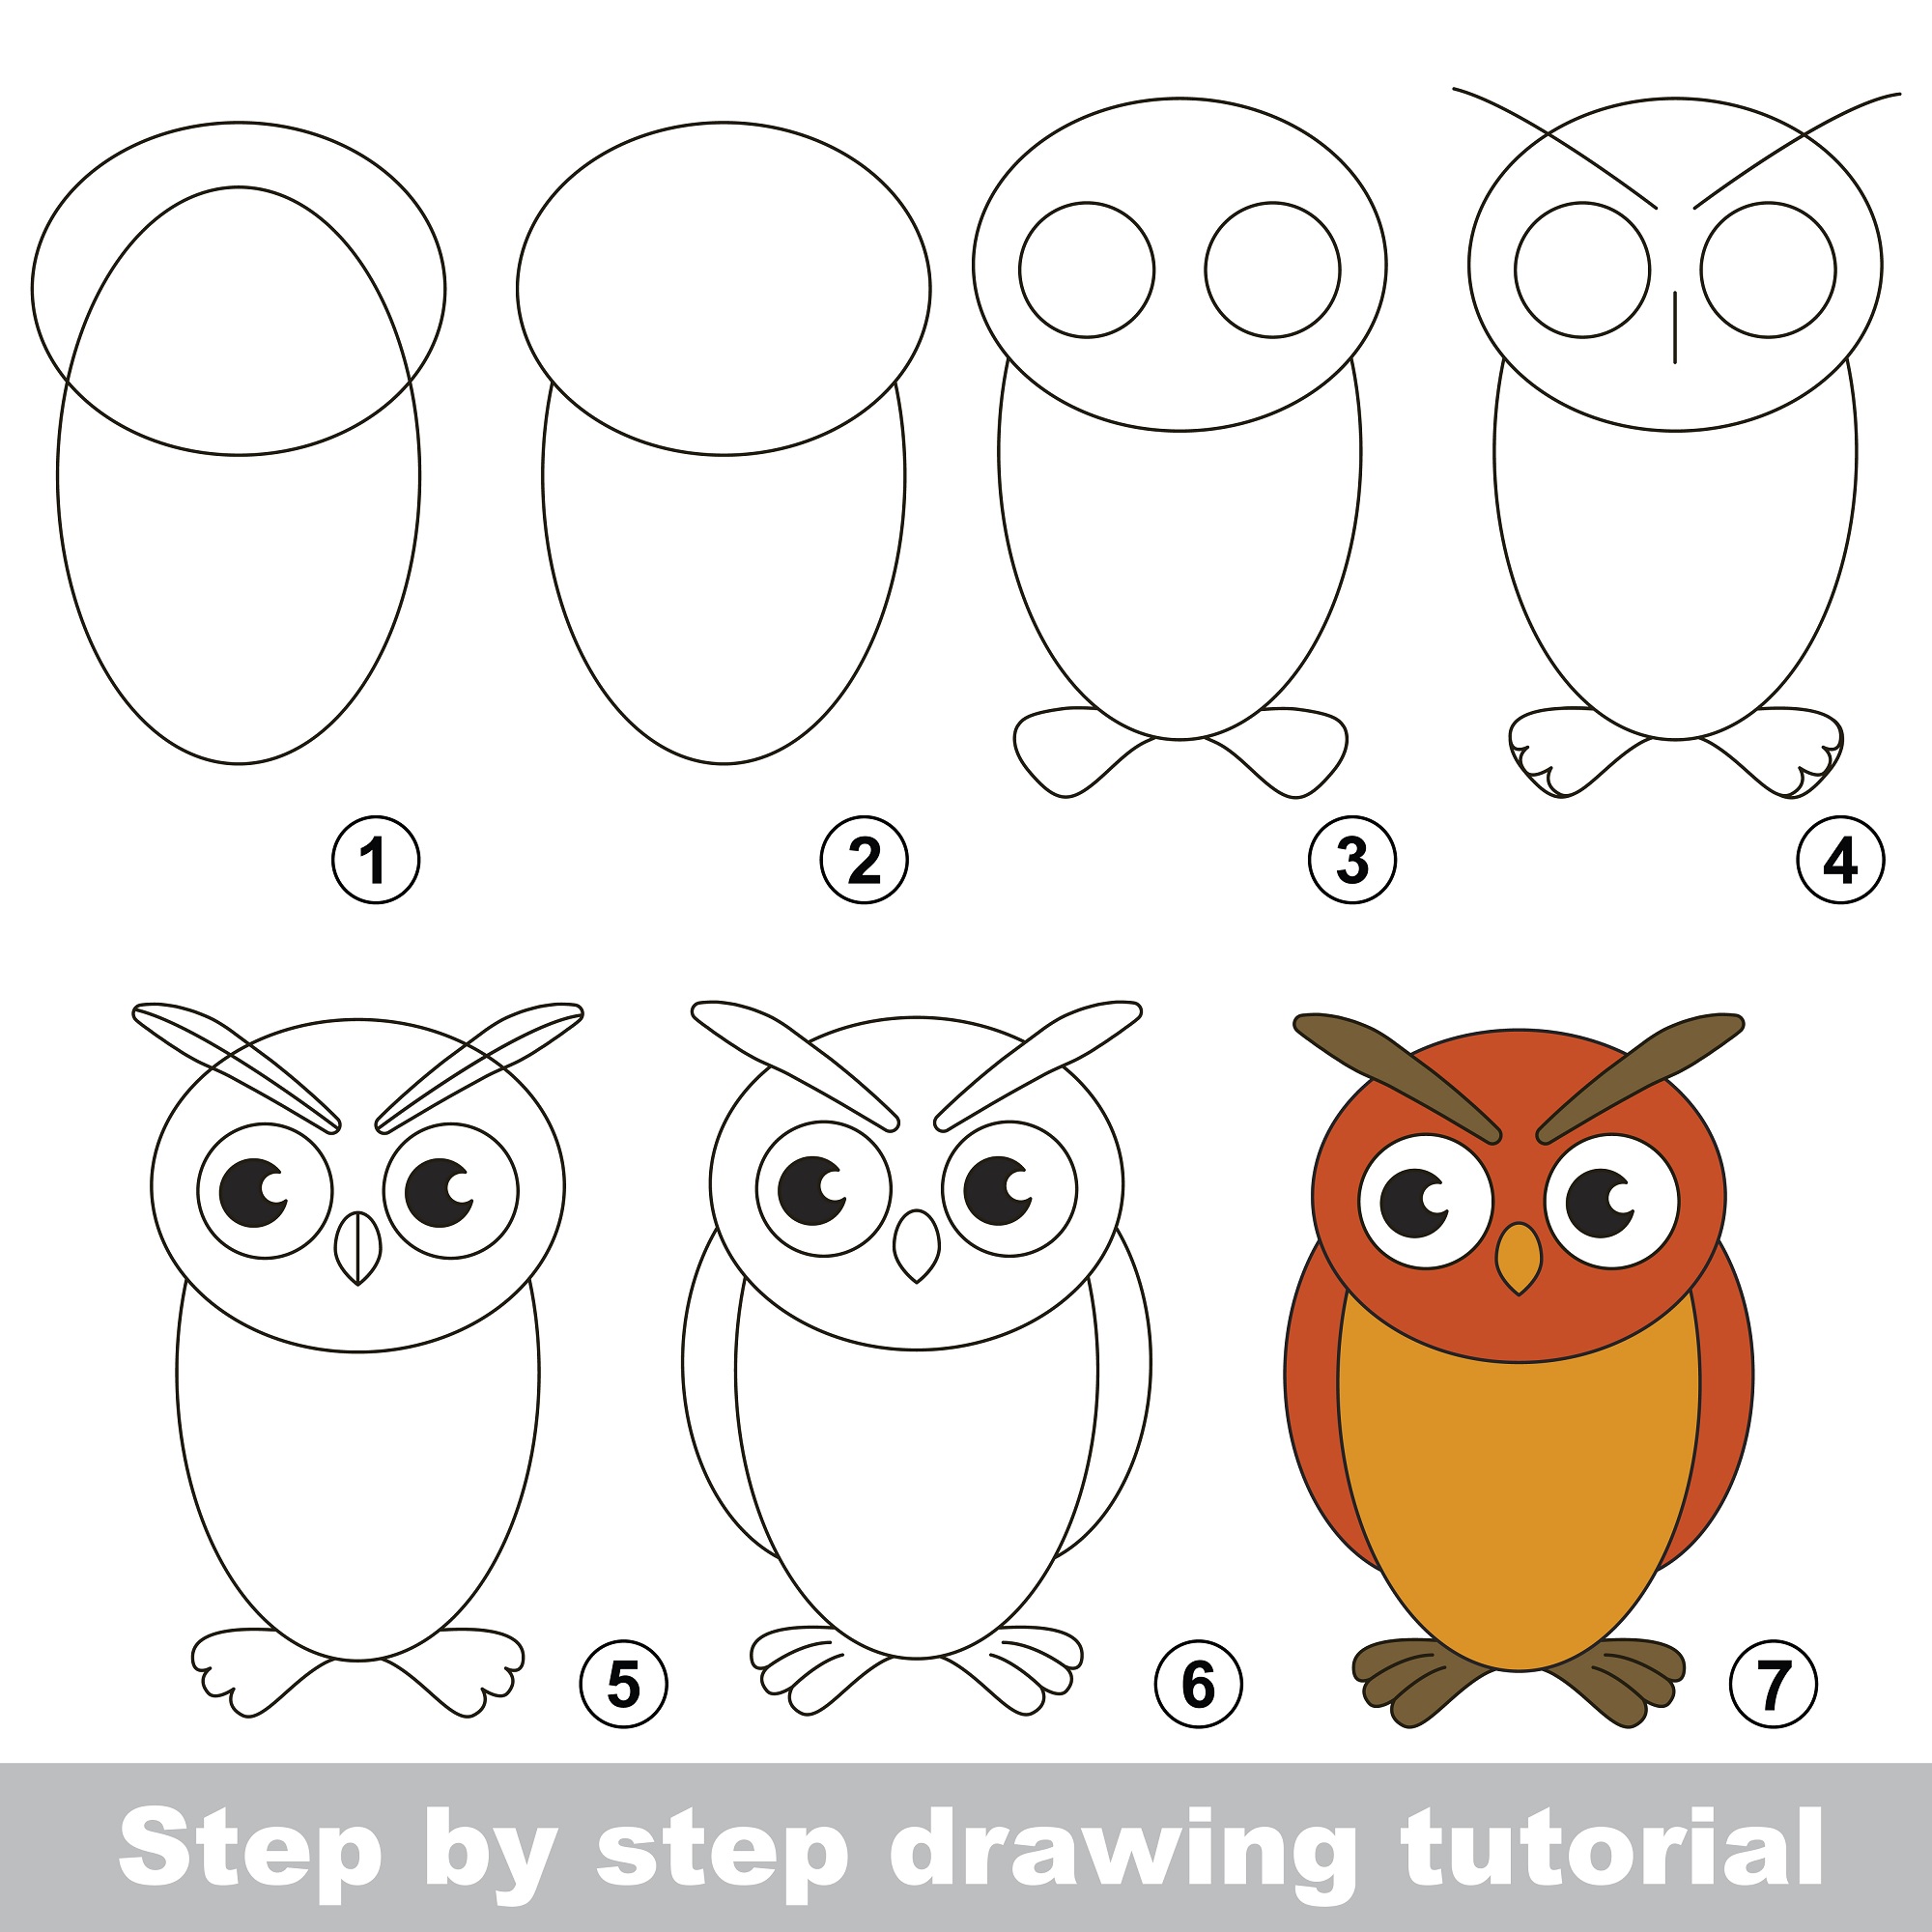
Step 1: Sketching the Owl
To start, lightly sketch the basic shapes of the owl using a pencil. Begin with a circle for the head and an oval shape for the body. Position them proportionately to create a balanced composition. Add two slightly curved lines to indicate the owl’s wings.
Step 2: Outlining the Owl
Once you’re satisfied with the initial sketch, use a darker pencil or pen to outline the shapes of the owl. Define the outline of the head, body, and wings, making them more distinct. Remember to keep your lines smooth and confident.
Step 3: Adding Details
Now it’s time to add details to your owl drawing. Focus on the facial features, such as the eyes, beak, and feathers. Owls have large, round eyes, so emphasize them by drawing circles within circles. Add the beak beneath the eyes and carefully sketch the intricate feather patterns.
Step 4: Shading and Texturing
To create a more realistic and dimensional look, start shading the owl’s feathers. Use a softer pencil or shading tool to add shadows and textures. Observe your reference image to understand how light and shadow play on the owl’s body. Gradually build up the shading, paying attention to the different areas of light and dark.
Step 5: Final Touches
In this step, refine your owl drawing by adding final touches and details. Adjust any areas that need improvement and make sure the proportions are correct. Add more depth and texture to the feathers by adding small lines and strokes. Take your time to make the drawing as detailed and realistic as possible.
Owl Printable Coloring Pages
You can view our owl printable coloring pages post here: https://drawadvisor.com/free-printable-owl-coloring-pages/
Download all 10 owl printables here: https://drawadvisor.com/wp-content/uploads/2023/05/owl-printable-coloring-pages-free-pdf.pdf
Parts of an Owl You Need to Draw
When drawing an owl, it’s important to include the various parts to capture its unique characteristics. Here are the different parts of an owl that you should consider including in your drawing:
- Head: The owl’s head is usually round and features large eyes and a facial disk, which is a circular area around the eyes that helps with hearing.
- Eyes: Owls have large, forward-facing eyes that are often the focal point of the drawing. The eyes are typically round or oval-shaped.
- Beak: The beak of an owl is hooked and curved, varying in size and shape depending on the species.
- Facial Disk: This refers to the circular area of feathers surrounding the owl’s eyes, helping to direct sound to their ears.
- Ears: Owls have asymmetrical ears, positioned on the sides of their head and often hidden by feathers. One ear is usually higher than the other, allowing them to locate prey accurately.
- Feathers: Owls have soft, fluffy feathers that help them fly silently and maintain their body temperature. Pay attention to the feather patterns and texture in your drawing.
- Wings: Draw the owl’s wings, depicting their shape and size relative to the body. Owls have broad wings that enable them to fly silently and with precision.
- Body: The body of an owl is typically plump and rounded. Consider the size and proportions of the body in relation to the head and wings.
- Talons: Owls have sharp, curved talons used for gripping and catching prey. Depict the talons on a branch or in a resting position.
- Tail: The owl’s tail feathers vary in length and shape, depending on the species. Take note of the tail’s appearance and how it complements the overall drawing.
Tips for Drawing Realistic Owls
- Study real owl photographs or observe owls in nature to understand their unique characteristics.
- Start with basic shapes and gradually add details to avoid overwhelming yourself.
- Practice shading techniques to create depth and dimension in your drawing.
- Experiment with different pencils and tools to achieve desired effects.
- Don’t be afraid to make mistakes; they are part of the learning process.
Frequently Asked Questions for Drawing Owls
Can I draw an owl using only a pen?
Yes, you can draw an owl using only a pen, but using pencils initially allows for easier corrections and adjustments.
How long does it take to become skilled at drawing owls?
The time required to become skilled at drawing owls varies from person to person. Consistent practice and patience are key.
What if my owl drawing doesn’t turn out as expected?
Don’t get discouraged! Remember that drawing an owl is a skill that improves with practice. Analyze what went wrong and try again.
Can I use colored pencils or markers to add color to my owl drawing?
Yes, you can use colored pencils or markers to add color and enhance your owl drawing.
Are there specific owl species that are easier to draw?
Some owl species, such as the barn owl or great horned owl, have distinct features that can make them slightly easier to draw.
Conclusion
Drawing an owl step-by-step can be a rewarding experience, allowing you to unleash your creativity and improve your artistic skills. Remember to start with a sketch, outline the owl, add details, shade and texture, and finalize the drawing with careful touches. With practice, patience, and attention to detail, you’ll be able to create impressive owl drawings. So grab your drawing tools and give it a try!
