Drawing can be a fun and creative activity for kids, and what better way to spark their imagination than by drawing a shark using the number 4 as a starting point? In this step-by-step guide, we will walk you through the process of drawing a shark by incorporating the number 4 as the foundation. So, grab your pencils, and let’s dive into the world of art!

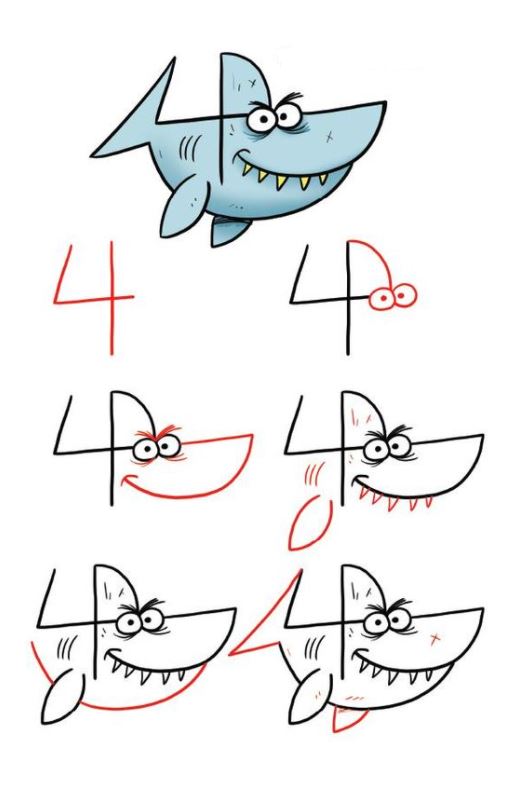
Step 1: Draw a 4 that is open at the top
To begin, start by drawing a number 4 on your paper. Make sure that the top of the 4 is open, resembling an incomplete circle.
Step 2: Draw the Shark’s head and mouth on the right side of the 4
Extend a curved line from the open end of the 4 to form the shark’s head. Add a small triangular shape to represent the mouth.
Step 3: Draw the eyes of the shark
Inside the head, draw two circular shapes to form the shark’s eyes. You can add small dots inside the circles to depict the pupils.
Step 4: Draw the teeth of the shark
Beneath the mouth, sketch a series of triangular shapes to create the shark’s sharp teeth. You can make them as big or small as you like, depending on the size of your drawing.
Step 5: Draw the body of the shark
From the shark’s head, draw a long curved line that extends downwards to create the body. Remember to leave space for the shark’s fin and tail.
Step 6: Draw the shark’s fin
On the top-right side of the shark’s body, draw a triangular shape that represents the dorsal fin. This fin helps the shark maintain balance and stability in the water.
Step 7: Draw the tail of the shark
At the end of the shark’s body, add a triangular shape that forms the tail. Make sure it tapers to a point, resembling the shape of a typical shark tail.
Step 8: Draw the gills of the shark
On the left side of the shark’s head, add a few curved lines to depict the gills. These lines will give your shark a more realistic appearance.
Step 9: Add details and color your shark
Now that you have the basic structure of the shark, you can add additional details such as scales, shading, or patterns. Use your imagination to bring your shark to life! You can also color your drawing using various shades of gray or any other colors you prefer.

4 Tips for Drawing a Shark:
Observe real shark images:
To enhance your drawing skills, study pictures or reference images of real sharks. Pay attention to their anatomy, details, and patterns to make your drawing more accurate.
Practice sketching basic shapes:
Before attempting to draw a complete shark, practice drawing basic shapes like circles, triangles, and curved lines. This will help you build a strong foundation for more complex drawings.
Use shading to add depth:
By applying light and dark shading techniques, you can add depth and dimension to your shark drawing. Experiment with different shading techniques to create a more realistic appearance.
Understanding the different parts of a shark:
Sharks have various distinctive features that make them fascinating creatures. By understanding the different parts of a shark, you can better portray its unique characteristics in your drawing. Some key parts include the head, eyes, mouth, teeth, body, fins, tail, gills, and scales.
How Kids Can Draw a Shark
Encourage children to follow the step-by-step instructions provided above, making it easier for them to grasp the process. Here are a few additional tips specifically tailored for young artists:
Break it down into shapes:
Explain to kids that drawing is often about breaking complex shapes into simpler ones. For example, they can see the shark’s body as a combination of circles, triangles, and curved lines. This approach makes the overall drawing more manageable.
Practice pencil control:
Drawing requires fine motor skills, and young children can benefit from practicing pencil control. Encourage them to hold the pencil properly and practice drawing straight and curved lines. This will help them gain better control and precision when drawing the shark.
Experiment with colors:
Kids can unleash their creativity by experimenting with colors when adding details to their shark drawings. Sharks come in various shades of gray, but there’s no harm in using different colors to make their artwork unique and imaginative. Encourage them to use their favorite colors or even create a fantasy shark with vibrant hues.

In Conclusion
Drawing a shark with the number 4 can be an enjoyable and educational activity for children. By following the step-by-step instructions and incorporating their creativity, kids can create their own unique shark masterpieces. Remember to encourage them to observe real shark images, practice basic shapes, and experiment with shading to enhance their drawing skills. So, grab your pencils, let your imagination soar, and dive into the wonderful world of drawing!