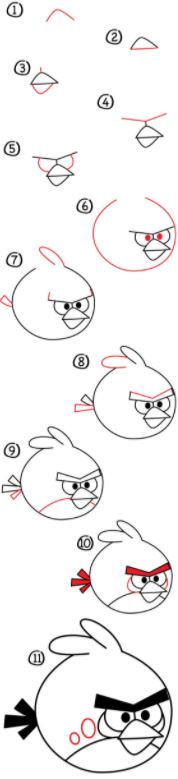
First, draw a circle that will make up the bird’s head. Second, draw the brow and the eyes and color in the pupils. Third, draw the beak, which is made up of two triangles on top of each other to form the mouth. Fourth, draw the hair on the top of the head and the backside of the angry bird. Fifth, draw the eyebrows and the details on the angry bird’s face.

Step-By-Step Red Angry Bird Drawing Tutorial
- Start by drawing a large, circular shape for the red angry bird’s head. The head should be wider at the bottom than at the top.
- Next, draw two smaller circles for Terence’s eyes, and a small curved line for his beak. The beak should be directly underneath the eyes.
- Add two feathers to the top of the angry bird’s head. The feathers should be two rounded shapes coming off the top center of the head.
- Draw the angry eyebrows above the eyes so it shows that the bird is actually angry.
- Draw the tail in the back, which is made up of three connecting rectangles.
- Add some details to the angry bird’s body, such as several circles to the face and a line that would make up the stomach of the bird.
- Finally, add some color to the angry bird to make it look more realistic. I would recommend coloring the bird red.
Make Your Angry Bird Drawing Your Own!
All you need to do is remember to make the head a rounded shape, color the bird in red, draw two pieces of hair at the top of the head, color the beak in yellow, draw a black tail at the back of the head, and draw the eyes and eyebrows so the bird looks mad.

In Summary
By following the steps above, you should easily be able to draw your own Angry Bird. It is simple a circle with several details that make up the face, tail, and feathers. Don’t forget to use the eyebrows so that it’s obvious the bird is an angry bird.
