If you’ve ever wanted to capture the charm of a rainy day in your own artwork, then you’re in the right place. This umbrella drawing tutorial will guide you through the process of how to draw an umbrella with simple, easy-to-follow steps. Whether you’re a beginner artist or simply looking to hone your skills, this guide is designed with you in mind. We will cover everything from the basic shape of the umbrella to adding the finer details that bring your drawing to life.
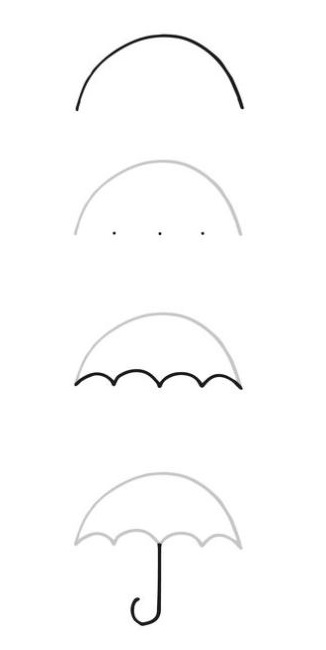
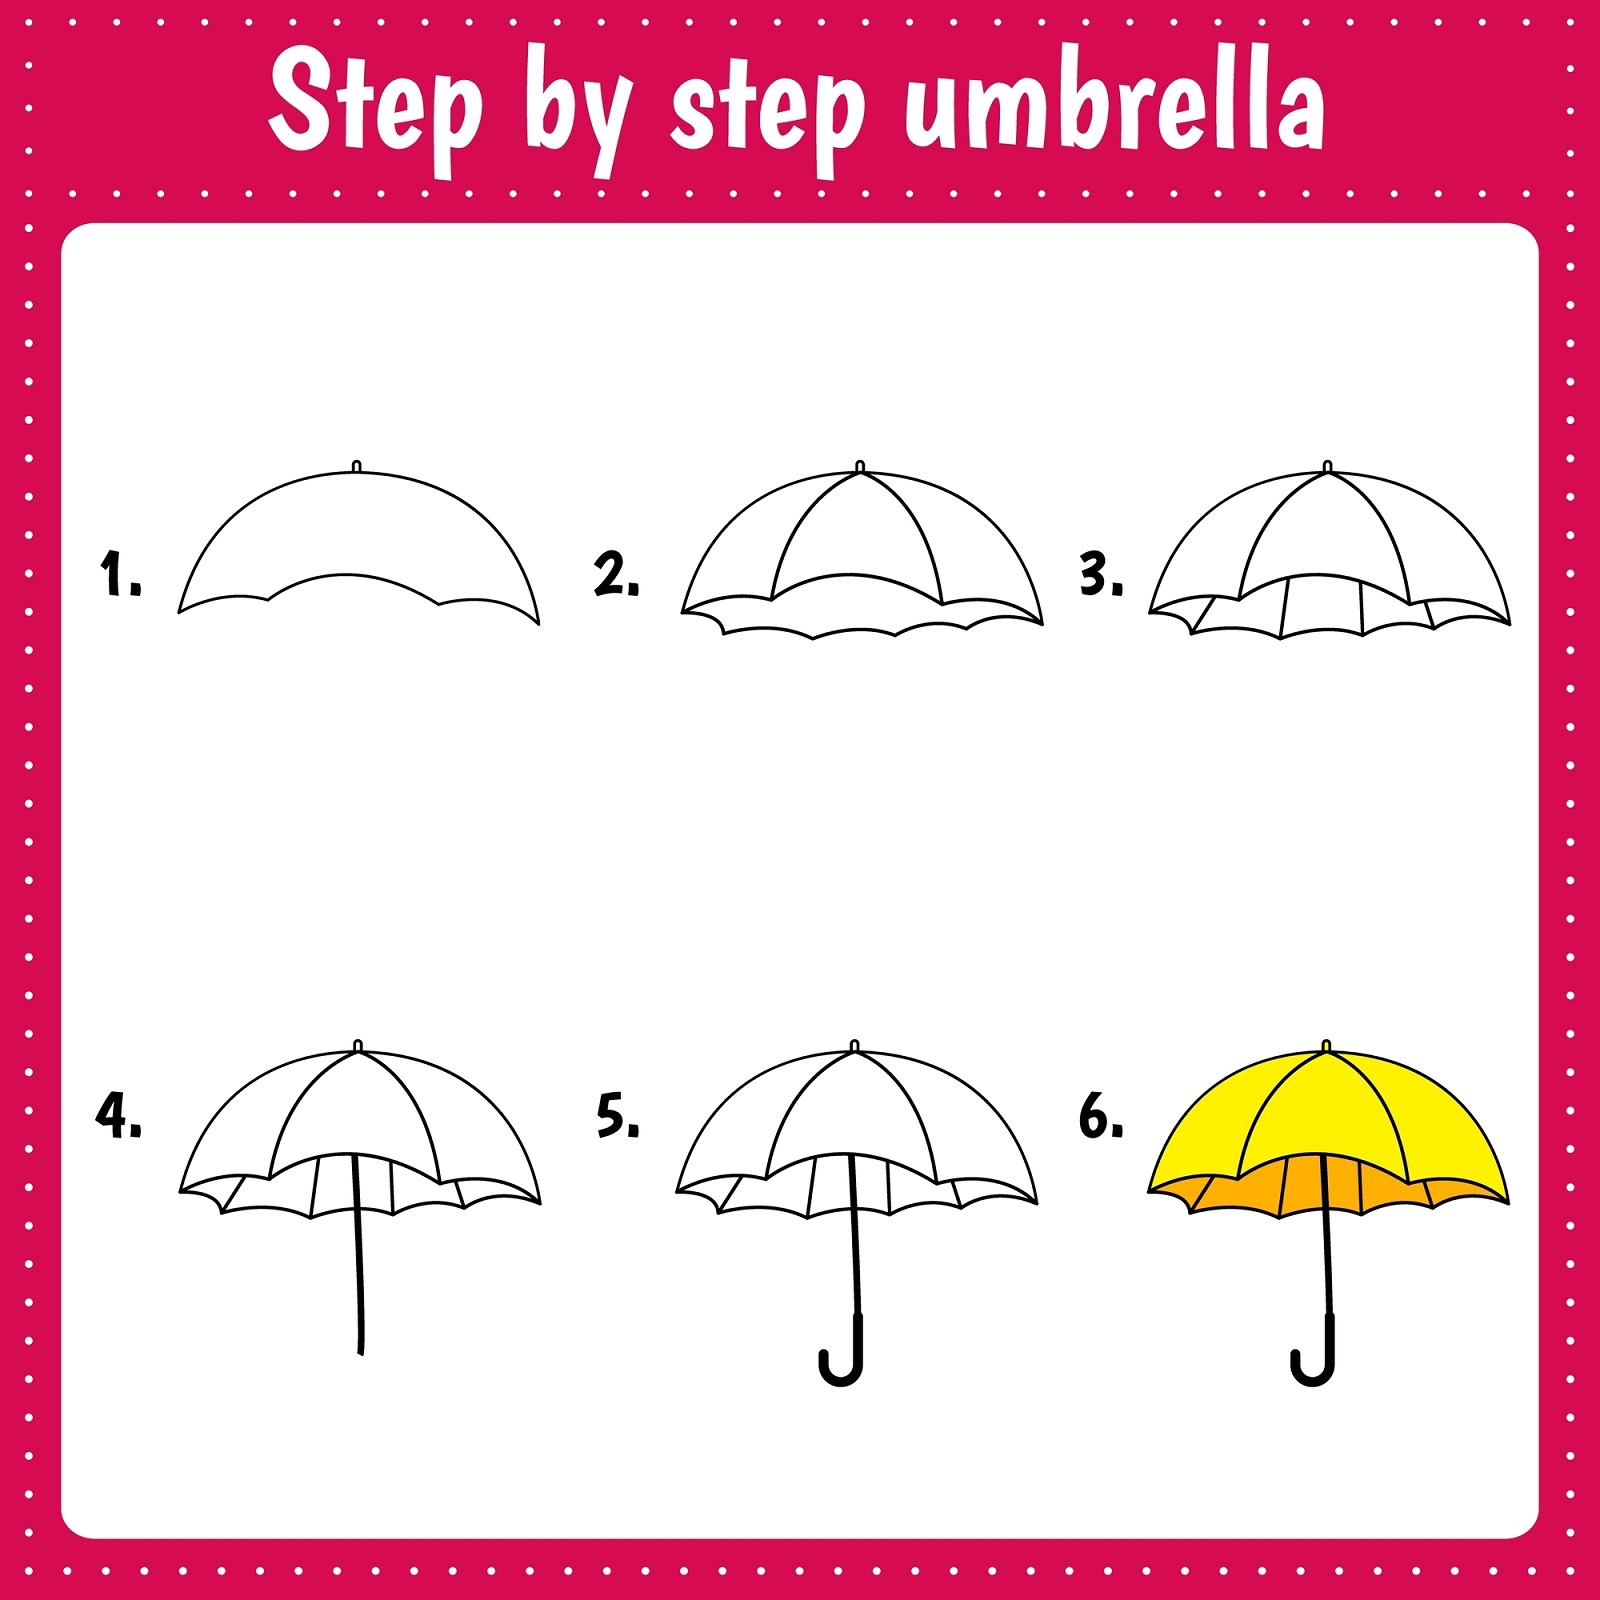
Step 1: Start by Drawing the Top of the Umbrella
Begin by drawing a horizontal line towards the top of your paper, this will serve as a guide for your umbrella’s top. Now, draw a curved line above it, forming a shape similar to a flattened half-circle. This represents the top of your umbrella.
Step 2: Draw the Umbrella’s Ribs
In the next step, draw straight lines from the curved line to the horizontal line to create the umbrella’s ribs. The ribs give the umbrella its characteristic shape, so be sure to space them evenly.
Step 3: Draw the Central Pole of the Umbrella
Next, draw a straight line from the middle of the horizontal line to the bottom of your paper. This will be the central pole of the umbrella.
Step 4: Draw the Umbrella Handle
At the bottom of the central pole, sketch out your umbrella handle. You can make it as simple or as fancy as you’d like. A common style is to draw a hook-shaped handle, similar to a candy cane.
Step 5: Detail the Umbrella Drawing
Back to the top of the umbrella, you can add more details by drawing additional curved lines between the ribs, these represent the folds of the fabric when the umbrella is opened.
Step 6: Draw the Top End of the Umbrella
At the top of your umbrella, where all the ribs meet, add a small circle or oval shape. This is the top end of the umbrella that holds everything together.
Step 7: Finishing Up Your Umbrella Drawing
Lastly, erase any unnecessary guidelines and add the final touches. This could include adding a pattern to the umbrella’s fabric or shading for a more 3D look.
Step 8: Coloring the Umbrella
The final step is to color your umbrella. This is where you can get creative! Use vibrant colors to make it stand out, or maybe try a traditional black and white umbrella.
FAQs for Drawing an Umbrella
What is an Umbrella?
An umbrella is a device designed to protect people from the rain or sun. It’s usually made from a waterproof material and is attached to a collapsible metal framework, controlled by a central rod.
What Color Are Umbrellas?
Umbrellas can come in a variety of colors and designs, ranging from simple solid colors like black or blue to bright colors with patterns and prints. Some may even feature intricate designs or branded images.
What does an Umbrella look like?
An umbrella usually has a circular or dome shape when opened, with a number of metal ribs extending from the central pole to support the waterproof fabric. It often has a handle at the bottom of the pole, which can be straight or hooked.
Who should draw an Umbrella?
Anyone who is interested in drawing or learning new skills can draw an umbrella. It’s a great object for beginners to practice due to its symmetrical shape and simple structure. Drawing an umbrella can be a fun activity for children, artists, or anyone looking to explore their creativity.
How can I teach kids to draw Umbrellas easily?
To teach kids to draw umbrellas easily, you can start with simple shapes. Begin with a half-circle for the top part of the umbrella, a straight line for the pole, and a small semi-circle for the handle. Then they can draw the ribs of the umbrella, which are lines radiating from the top of the pole to the edge of the umbrella’s canopy. Keeping the instructions simple and breaking down the umbrella into basic shapes will make it easier for kids to follow.
What are the different parts of an Umbrella I need to draw?
When drawing an umbrella, the main parts you’ll need to focus on are the canopy (the fabric part that opens out), the ribs (the supporting structures beneath the canopy), the central pole, and the handle. Depending on your perspective, you may also need to include the top end of the umbrella, which often has a small cap or point.
Conclusion
By following this umbrella drawing tutorial, you’ve not only learned how to draw an umbrella but also added a versatile element to your artistic arsenal. Just like the weather, your artistic journey will have both sunny and rainy days. But remember, every drawing you create, whether perfect or imperfect, adds to your growth as an artist. So, keep that pencil moving and continue to create your world, one drawing at a time. We look forward to seeing where your art takes you next.